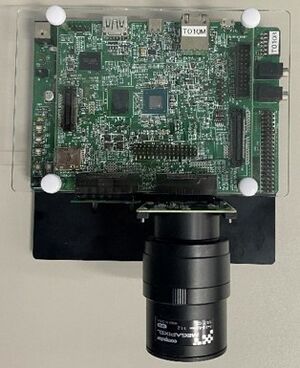
RZ-V/RZ-V2M EVK: Difference between revisions
No edit summary |
|||
| Line 63: | Line 63: | ||
|} | |} | ||
'''4. Prepare an SD Card''' | '''4. Prepare an SD Card''' | ||
* The evaluation boards can be booted from SD Cards. The SD card must be formatted and loaded using a Linux PC. A helpful script has been created '''([https://github.com/renesas-rz/rzg2_bsp_scripts/tree/master/usb_sd_partition usb_sd_partition])''' that you can run on your Linux PC. | |||
* Insert your micro SD card into a '''USB-SD-Card reader''' and then plug into a Linux PC. | |||
* Use the commands below to download the formatting script and run. Please select your card and choose the default settings. | |||
<pre> | |||
$ wget https://raw.githubusercontent.com/renesas-rz/rzg2_bsp_scripts/master/usb_sd_partition/usb_sd_partition.sh | |||
$ chmod +x usb_sd_partition.sh | |||
$ ./usb_sd_partition.sh | |||
</pre> | |||
* Use the commands below to copy the files you build with the BSP to the SD card. '''Start in the base of your Yocto BSP'''. | |||
<pre> | |||
# Change to the Yocto output directory that contains the files | |||
$ cd build/tmp/deploy/images/rzv2m | |||
# Copy the Linux kernel and Device Tree to partition 1 | |||
$ sudo cp -v Image /media/$USER/RZ_FAT | |||
$ sudo cp -v r9a09g011gbg-evaluation-board.dtb /media/$USER/RZ_FAT | |||
# Copy and expand the Root File System to partition 2 | |||
$ sudo tar -xvf core-image-bsp-rzv2m.tar.gz -C /media/$USER/RZ_ext | |||
# Make sure all files are finished writing before removing the USB card reader from the PC | |||
$ sync | |||
</pre> | |||
* Safely remove your USB card reader by right clicking on the drive icon (either RZ_FAT or RZ_ext) in Ubuntu and selecting "Eject" | |||
'''5. Power the Board and Connect to the Serial Port''' | '''5. Power the Board and Connect to the Serial Port''' | ||
'''6. Switch settings for the CPU SOM board.''' | '''6. Switch settings for the CPU SOM board.''' | ||
Revision as of 21:02, 27 October 2021
← RZ-V
General Information
🚧 Coming soon...
Getting Started
1. Software BSP Components
- Linux BSP package: Obtain the 'rzv2m_bsp_eva_v110.tar.gz' tar file. This is located the RZV2M Linux Package downloaded zip file r01an5971ej0110-rzv2m-linux.zip downloaded from the Renesas RZV2M site. The tar file is in the 'bsp' sub folder of the extracted zip file.
- ISP Support package: Obtain the 'rzv2m_isp_support-pkg_v110.tar.gz' file from the RZV2M ISP Support Package file 'r01an5978ej0110-rzv2m_isp-support.zip' downloaded from the Renesas RZV2M site.
- DRP-AI Support package: Obtain the DRP AI driver 'rzv2m_meta-drpai_ver5.00.tar.gz' and DRP Application 'rzv2m_meta-drpai_ver5.00.tar.gz'. These are packaged in the RZV2M DRP-AI Support Package file 'r11an0530ej0500-rzv2m-drpai-sp.zip', downloaded from the Renesas RZV2M site. Once the zip file is extracted the driver is located in the rzv2m_drpai-driver sub-directory. The DRP Application software is located in the rzv2m_drpai-sample-application directory.
2. Build Environment
- To build the BSP, you will need a Linux environment running Ubuntu 16.04.
- A docker file is available at the Renesas RZ Software Github here
- VM is not recommended.
3. Build the BSP
- The complete set of BSP Components need to be combined into the same directory.
- Detailed instructions for setup and building are located in the components release notes ( RZV2M Linux Package, RZV2M ISP Support Package, and RZV2M DRP-AI Support Package).
- NOTE: RZV2M ISP Support Package release note is not included in the archieve file but is a seperate download on the Renesas RZV2M website.
- A summary of the instructions located in the Release Notes are below. Simply Copy/Paste the commands
| Simple build instructions for BSP v1.10 |
|
These instructions are a summary of what is explained in the package Release Notes. # Create Working Build directory mkdir ./rzv2m_bsp_v110 # Extract the rzv2m bsp to the working directory tar -xvf rzv2m_bsp_eva_v110.tar.gz -C ./rzv2m_bsp_v110 # Extract the rzv2m DRP-AI bsp to the working directory tar -xvf rzv2m_meta-drpai_ver5.00.tar.gz -C ./rzv2m_bsp_v110 # Extract the RZV2M ISP to the working directory tar -xvf rzv2m_isp_support-pkg_v110.tar.gz -C ./rzv2m_bsp_v110 cd rzv2m_bsp_v110 # Initialize Yocto build environment source poky/oe-init-build-env # Apply RZV2M build configuation files cp ../meta-rzv2m/docs/sample/conf/rzv2m/linaro-gcc/*.conf ./conf/ # Apply DRP-AI Patch patch -p2 < ../rzv2m-drpai-conf.patch # Apply ISP Patch patch -p2 < ../rzv2m-isp-conf.patch # Start Yocto Build bitbake core-image-bsp bitbake core-image-bsp -C populate_sdk |
4. Prepare an SD Card
- The evaluation boards can be booted from SD Cards. The SD card must be formatted and loaded using a Linux PC. A helpful script has been created (usb_sd_partition) that you can run on your Linux PC.
- Insert your micro SD card into a USB-SD-Card reader and then plug into a Linux PC.
- Use the commands below to download the formatting script and run. Please select your card and choose the default settings.
$ wget https://raw.githubusercontent.com/renesas-rz/rzg2_bsp_scripts/master/usb_sd_partition/usb_sd_partition.sh
$ chmod +x usb_sd_partition.sh
$ ./usb_sd_partition.sh
- Use the commands below to copy the files you build with the BSP to the SD card. Start in the base of your Yocto BSP.
# Change to the Yocto output directory that contains the files
$ cd build/tmp/deploy/images/rzv2m

# Copy the Linux kernel and Device Tree to partition 1
$ sudo cp -v Image /media/$USER/RZ_FAT
$ sudo cp -v r9a09g011gbg-evaluation-board.dtb /media/$USER/RZ_FAT

# Copy and expand the Root File System to partition 2
$ sudo tar -xvf core-image-bsp-rzv2m.tar.gz   -C /media/$USER/RZ_ext

# Make sure all files are finished writing before removing the USB card reader from the PC
$ sync
- Safely remove your USB card reader by right clicking on the drive icon (either RZ_FAT or RZ_ext) in Ubuntu and selecting "Eject"
5. Power the Board and Connect to the Serial Port
6. Switch settings for the CPU SOM board.


