RZ-G/RZG graphics: Difference between revisions
| Line 65: | Line 65: | ||
=== Build OpenCV using Yocto (enabling OpenCL) === | === Build OpenCV using Yocto (enabling OpenCL) === | ||
OpenCV can be built also using Yocto but it won't include the support for OpenCL by default. There is a way to build OpenCV (version 3.3.0 in Rocko) using Yocto by adding: | OpenCV can be built also using Yocto but it won't include the support for OpenCL by default. There is a way to build OpenCV (version 3.3.0 in Rocko, version 4.1.0 in Dunfell) using Yocto by adding: | ||
PACKAGECONFIG_append_pn-opencv = " gtk opencl" | PACKAGECONFIG_append_pn-opencv = " gtk opencl" | ||
to local.conf. The opencv recipe has to be modified as well, in opencv_3.3.bb, replace: | to local.conf. The opencv recipe has to be modified as well, in opencv_3.3.bb or opencv_4.1.bb, replace: | ||
PACKAGECONFIG[opencl] = "-DWITH_OPENCL=ON,-DWITH_OPENCL=OFF,opencl-headers virtual/opencl-icd," | PACKAGECONFIG[opencl] = "-DWITH_OPENCL=ON,-DWITH_OPENCL=OFF,opencl-headers virtual/opencl-icd," | ||
with: | with: | ||
| Line 76: | Line 76: | ||
First of all we need to build an SDK and rootfs WITHOUT OpenCV support, the libraries have to be added manually to the rootfs. The rootfs system is important to make sure that opencv gets compiled correctly, actually cmake searches for libraries and dependencies there and then generates the appropriate makefile. | First of all we need to build an SDK and rootfs WITHOUT OpenCV support, the libraries have to be added manually to the rootfs. The rootfs system is important to make sure that opencv gets compiled correctly, actually cmake searches for libraries and dependencies there and then generates the appropriate makefile. | ||
To do this, please follow the instruction available in the latest [https://www.renesas.com/us/en/products/microcontrollers-microprocessors/rz-cortex-a-mpus/rzg-linux-platform/rzg-marketplace/verified-linux-package/rzg2-vlp-eva release note]. Do not forget to source the environment setup file, e.g: | To do this, please follow the instruction available in the latest [https://www.renesas.com/us/en/products/microcontrollers-microprocessors/rz-cortex-a-mpus/rzg-linux-platform/rzg-marketplace/verified-linux-package/rzg2-vlp-eva release note] for RZ/G2E-N-M-H, or [https://www.renesas.com/document/mat/rzg2l-group-yocto-recipe-start-guide?language=en&r=1467981 this document] for RZ/G2L . Do not forget to source the environment setup file, e.g: | ||
source /opt/poky/2.4.3/environment-setup-aarch64-poky-linux | source /opt/poky/2.4.3/environment-setup-aarch64-poky-linux | ||
or | |||
source /opt/poky/3.1.5/environment-setup-aarch64-poky-linux | |||
Then we're ready to start building OpenCV: | Then we're ready to start building OpenCV: | ||
git clone <nowiki>https://github.com/opencv/opencv</nowiki> | git clone <nowiki>https://github.com/opencv/opencv</nowiki> | ||
| Line 106: | Line 108: | ||
The openCV library is going to be installed in the path of the host machine specified in the cmake command (PATH_TO_OPENCV_INSTALL), e.g.: | The openCV library is going to be installed in the path of the host machine specified in the cmake command (PATH_TO_OPENCV_INSTALL), e.g.: | ||
/home/user/opencv_install/usr | /home/user/opencv_install/usr | ||
The home folder is used to avoid that the cross compiled library are mixed with potentially installed native libraries (x86_64). | The home folder is used to avoid that the cross compiled library are mixed with potentially installed native libraries (x86_64). In some cases the CMAKE_INSTALL_PREFIX may be ignored, if this happens, manually modify the default installation path in the cmake_install.cmake file. | ||
Another point to highlight is that OpenCV libraries are built by default with OpenCL support enabled (WITH_OPENCL ON). | Another point to highlight is that OpenCV libraries are built by default with OpenCL support enabled (WITH_OPENCL ON). | ||
Revision as of 09:15, 5 November 2021
← RZ-G
Qt
Build Qt outside of Yocto
First of all the RZ/G2 SDK is needed: core-image-qt-sdk is what you want to build. By default it is installed in /opt/poky/2.4.3 (RZ/G2E-M-N-H).
Install gperf and nss-dev to target rootfs (needed by qtwebengine, TODO: still not working because of nss includes not found).
Actually if gperf is not there, qtwebengine is not selected by the configure, so no problem in building, in other words no need to explicitly set -skip qtwebengine.
Steps to build (refer to this script for more details):
- clone (potentially checkout specific version)
- init repository
- mkdir/cd qt5-build
- ../configure ….. (many flags)
- make
- make install
- rsync to sysroot location (e.g. SD)
About flags, a notable one is: -qpa, should be set to wayland or wayland-egl. This page has more info. -no-feature-xcomposite-egl, important otherwise the install fails at link stage.
Version 5.6.3 and the newly built version can coexist. If not changed Qt is installed into /usr/local/Qt5.x.y.
Qt apps development environment set-up
In order to develop a Qt application it would be easier to install Qt on the host PC, that includes also the IDE (Qt creator).
Once installed in Ubuntu, Qt creator icon should be visible in the application list, or it can be launched from the command prompt:
~/Qt5.12.10/Tools/QtCreator/bin/qtcreator.sh
If not already done, before launching Qt creator it is required to source the SDK environment setup script, for example:
source /opt/poky/2.4.3/environment-setup-aarch64-poky-linux
Qt creator is normally configured to develop, debug and run x86 applications. In order to cross develop, debug and run applications on the RZ/G2 some configurations are needed.
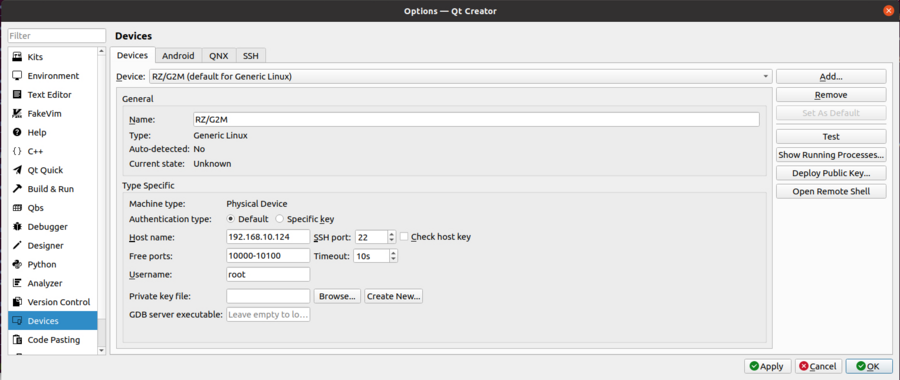
First, a new device has to be added, Tools -> Options -> Devices, then add a new device as per screenshot below:
Obviously adapting the IP address to match the RZ/G2 board IP address. Note that SFTP (openssh-sftp-server) and/or rsync must be installed on the target to be able to deploy the binaries.
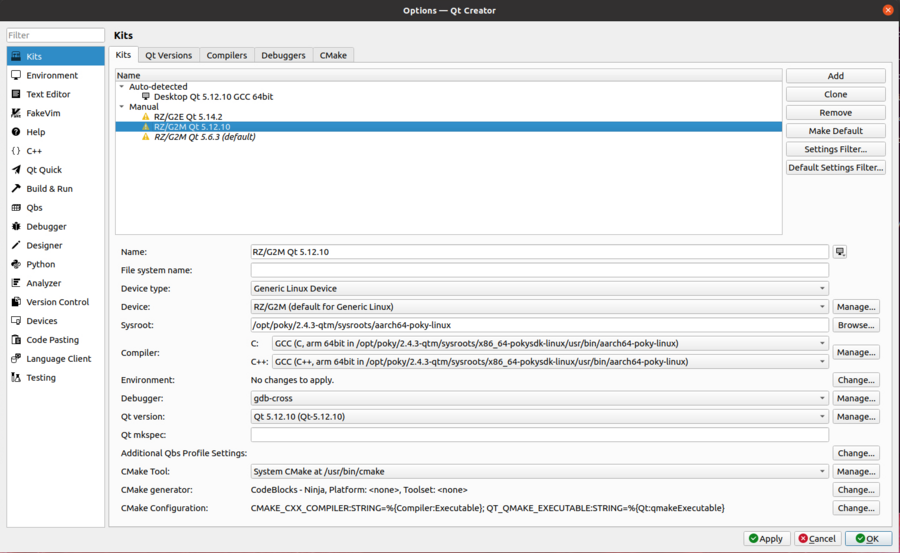
Then go to the Kits tab and add a new Kit in the manual section:
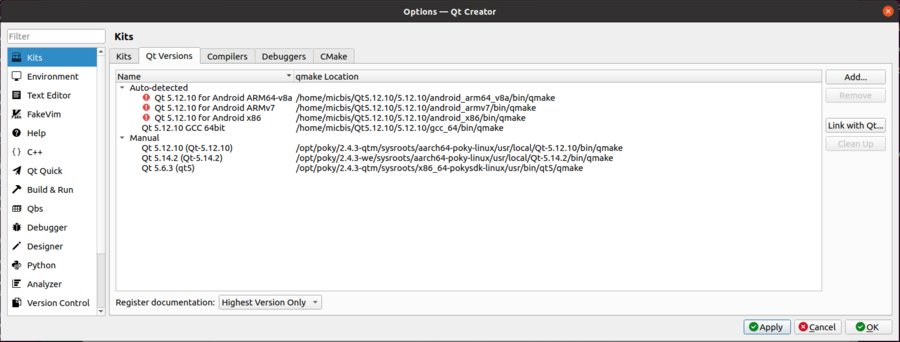
Now Qt version tab:
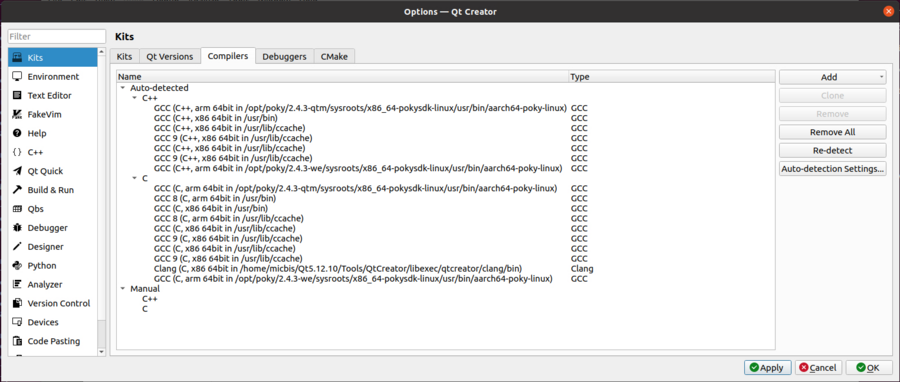
Compilers:
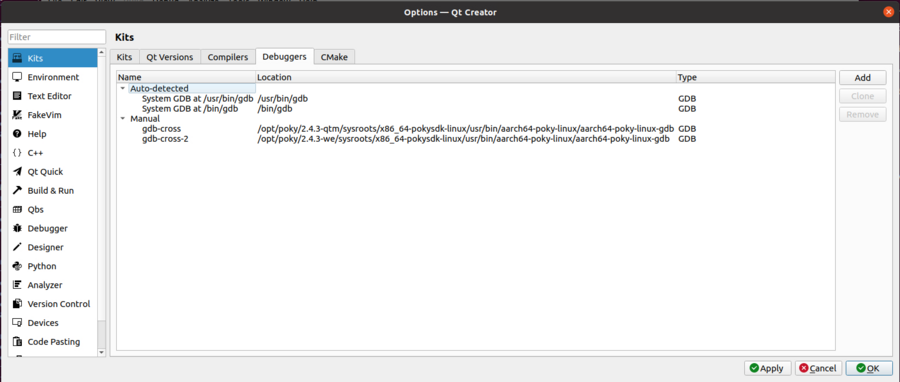
And finally Debuggers:
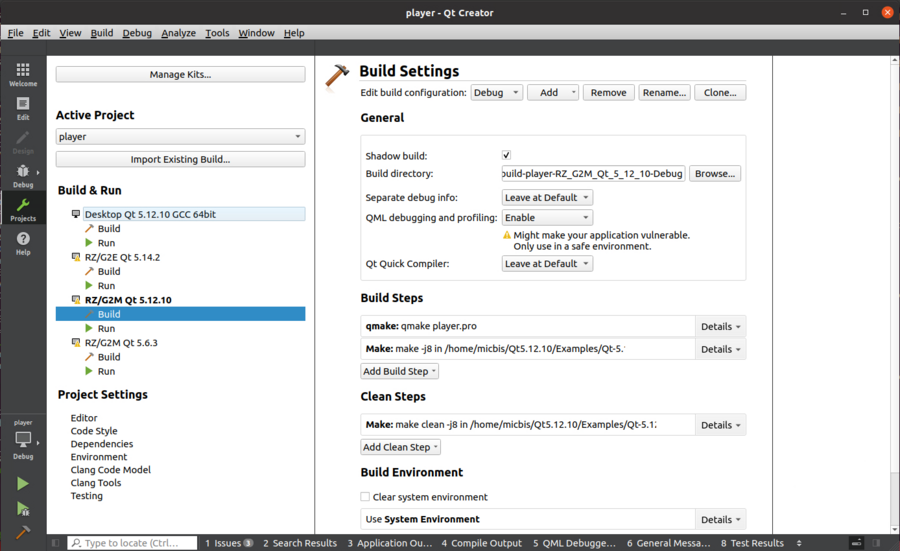
Once the kit is configured, you can pick one of the many Qt examples available in the standard installation and make sure to use the Kit(s) just created:
At this point you should be able to build, debug and run Qt applications on a RZ/G2 board.
OpenCV with OpenCL
Build OpenCV using Yocto (enabling OpenCL)
OpenCV can be built also using Yocto but it won't include the support for OpenCL by default. There is a way to build OpenCV (version 3.3.0 in Rocko, version 4.1.0 in Dunfell) using Yocto by adding:
PACKAGECONFIG_append_pn-opencv = " gtk opencl"
to local.conf. The opencv recipe has to be modified as well, in opencv_3.3.bb or opencv_4.1.bb, replace:
PACKAGECONFIG[opencl] = "-DWITH_OPENCL=ON,-DWITH_OPENCL=OFF,opencl-headers virtual/opencl-icd,"
with:
PACKAGECONFIG[opencl] = "-DWITH_OPENCL=ON,-DWITH_OPENCL=OFF,"
Actually normally you don't want to modify the original recipe but rather write you own opencv_3.3.bbappend to do that. Anyway the OpenCV rocko version is rather old, newer versions have much better performances.
Build OpenCV from sources
First of all we need to build an SDK and rootfs WITHOUT OpenCV support, the libraries have to be added manually to the rootfs. The rootfs system is important to make sure that opencv gets compiled correctly, actually cmake searches for libraries and dependencies there and then generates the appropriate makefile.
To do this, please follow the instruction available in the latest release note for RZ/G2E-N-M-H, or this document for RZ/G2L . Do not forget to source the environment setup file, e.g:
source /opt/poky/2.4.3/environment-setup-aarch64-poky-linux
or
source /opt/poky/3.1.5/environment-setup-aarch64-poky-linux
Then we're ready to start building OpenCV:
git clone https://github.com/opencv/opencv
We also need the extra packages:
git clone git://github.com/opencv/opencv_contrib.git contrib
Then:
cd opencv
git checkout tags/4.5.1
mkdir build
cd build
cmake -DCMAKE_BUILD_TYPE=RELEASE -DOPENCV_EXTRA_MODULES_PATH=../../contrib/modules \
-DCMAKE_INSTALL_PREFIX=/PATH_TO_OPENCV_INSTALL/usr -D INSTALL_C_EXAMPLES=ON \
-DCMAKE_TOOLCHAIN_FILE=/PATH_TO_AARCH64_CMAKE/aarch64-gnu.toolchain.cmake ..
You would want to adjust "PATH_TO_OPENCV_INSTALL" and "PATH_TO_AARCH64_CMAKE".
The aarch64-gnu.toolchain.cmake file is needed to configure the cmake for a cross-build. This is where we specify where cmake has to search for tools and libraries, the paths in this file should be potentially adjusted.
It is also important to specify a directory where the opencv package should be installed, we have to make sure we select a path where it is easy to copy to the final rootfs, a directory inside home should be fine. Actually we can also select the final rootfs directly and then copy from there to the target.
LINK to aarch64-gnu.toolchain.cmake REPOSITORY
It is important to check the output, we want the GTK libraries to be recognized, otherwise the GUI examples won't work. If something is missing, then the rootfs shall be rebuilt to include the missing packages. If something goes wrong you could also try to source the SDK environment script (environment-setup-aarch64-poky-linux).
Instead, if everything's fine, then we are ready to build:
make -j$(nproc)
If it is successful (it'll take a while) we can install it:
make install
The openCV library is going to be installed in the path of the host machine specified in the cmake command (PATH_TO_OPENCV_INSTALL), e.g.:
/home/user/opencv_install/usr
The home folder is used to avoid that the cross compiled library are mixed with potentially installed native libraries (x86_64). In some cases the CMAKE_INSTALL_PREFIX may be ignored, if this happens, manually modify the default installation path in the cmake_install.cmake file.
Another point to highlight is that OpenCV libraries are built by default with OpenCL support enabled (WITH_OPENCL ON).
Now, to use this library we should copy it to the rootfs, both on the host (for the cross compilation of the examples) and the target.
Assuming the target rootfs is mounted in the path /media/user/RZ_ext:
sudo cp -rpf usr/* /media/user/RZ_ext/usr/
sync
For the host:
sudo cp -rpf usr/* /opt/poky/2.4.3/sysroots/aarch64-poky-linux/usr/
Now let's build some examples. The first example is simply opening an image and displaying it.
LINK to simple display REPOSITORY
cmake -DCMAKE_TOOLCHAIN_FILE=./aarch64-gnu.toolchain.cmake .
Then:
make
Now we can download the binary onto the target:
scp DisplayImage root@TARGET_IP_ADDRESS:/home/root
On the RZ/G2, it can be run by giving the following command:
./DisplayImage Cherries.jpg
The previous example uses OpenCV but it does not use any OpenCL feature. In order to try this, we need to use an example that uses the CPU or the GPU taking advantage of the OpenCL libraries. First of all, install the libraries (contact sales rep to get them) as described in the section 5 "How to Apply" of the Release Note and verify that the libraries are working by testing the example (section 6.2).
Now we build and deploy another OpenCV example that uses the Transparent APIs.
LINK to MatUMat REPOSITORY
Similarly to what was done for the simple example:
cmake -DCMAKE_TOOLCHAIN_FILE=./aarch64-gnu.toolchain.cmake .
Then:
make
Now we can download the binary onto the target:
scp Mat root@TARGET_IP_ADDRESS:/home/root
scp UMat root@TARGET_IP_ADDRESS:/home/root
scp image.jpg root@TARGET_IP_ADDRESS:/home/root
On the RZ/G2 by running Mat we load the image.jpg, perform some image processing and display the result image. It also prints on the terminal the time to process that image:
root@hihope-rzg2m:~# ./Mat
0.396389
UMat, instead, uses the GPU, when we run it the first time:
root@hihope-rzg2m:~# ./UMat
[ WARN:0] global /home/micbis/OpenCL/OpenCV/opencv/modules/core/src/utils/filesystem.cpp (489) getCacheDirectory Using world accessible cache directory. This may be not secure: /var/tmp/
1.86048
So slower than the CPU. But the next times:
root@hihope-rzg2m:~# ./UMat
[ WARN:0] global /home/micbis/OpenCL/OpenCV/opencv/modules/core/src/utils/filesystem.cpp (489) getCacheDirectory Using world accessible cache directory. This may be not secure: /var/tmp/
0.019532
That is roughly 20x faster than the CPU on this kind of processing: color conversion, Gaussian Blur and Canny edge. A good improvement, uh? However this kind of result is not guaranteed, there might be situations where the GPU is slower, others where the improvement is even higher. Of course it also depends on the GPU vs CPU performance. In the case above the GPU of the RZ/G2M is quite powerful, different derivatives may have different result.


