RZ/G OpenOCD Information
← RZ-G
Introduction
This page provides a guide to use OpenOCD and compatible JTAG debugger devices on RZ/G2 platforms.
Target Devices
- RZ/G2L-LC-UL, RZ/Five SMARC evaluation boards
- RZ/G2E EK874 Rev C (or newer)
- RZ/G2M-N-H HiHope rev3 (or newer)
Overview
OpenOCD is an opensource software that provides on-chip programming and debugging feature, with support from compatible JTAG hardware debugger devices.
Prerequisites
A compatible JTAG hardware debugger device is required. Different JTAG devices can have slightly different procedure.
As an example, following guidance is for:
- Flyswatter2 device from Tin Can Tools, LLC.
- J-Link debug probes
- ARM-JTAG-20-10 Adapter (Mouser) (Digi-Key)
Environment
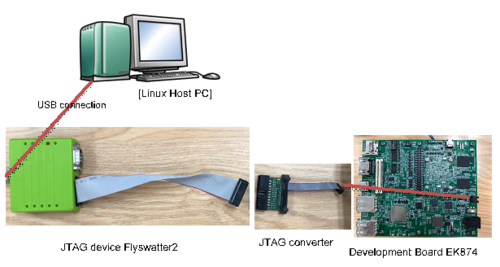
Below illustration shows how user should connect RZ/G2 platform with JTAG debugger and OpenOCD (run on a Linux Host PC). Note that most RZ/G2 development board has 10 pin JTAG header, so a JTAG converter (20pin-10pin) is required, for example the Olimex ARM-JTAG-20-10. The following pictures illustrates how to setup the environment with a Flyswatter2 and a EK874 (RZ/G2E) board. The setup is similar if other JTAG debuggers and/or devices are used.
Hardware setup
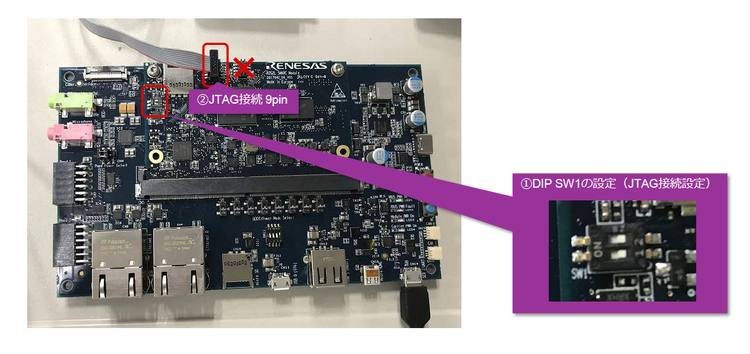
After connecting the devices as per guide in the previous section, follow below instructions to use OpenOCD and JTAG debugger. You must change the switches setting on development board to enable the JTAG debugging feature. The switches setting may be different for each development board. Please refer to the relevant board manual or user guide for detailed information.
SMARC RZ/G2L-LC-UL, RZ/Five board
Change switches as per below.
- SW1: OFF - OFF
EK874 RZ/G2E board
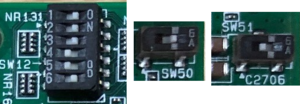
Change switches as per below. Note that board version 3 (Rev C) or later must be used.
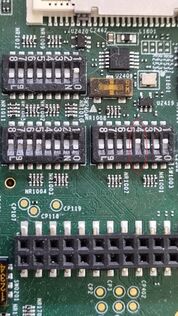
- SW12: change bit 4 and 5 to OFF to enable JTAG
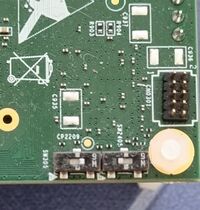
- SW50: change to (2-3) side
- SW51: change to (1-2) side
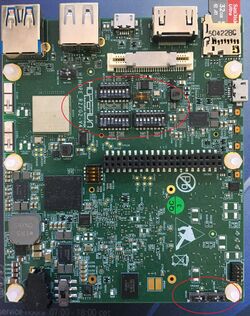
HiHope RZ/G2M-N-H board
Change switches as per below. Note that board rev. 3 or later must be used.
- SW1003: change bit 4 to OFF to enable JTAG
- SW305: change to (2-3) side
- SW2405: change to (1-2) side
Download and Build OpenOCD
To build OpenOCD you can use this script found in the https://github.com/renesas-rz/rzg_openocd repository.
$ wget https://raw.githubusercontent.com/renesas-rz/rzg_openocd/master/build_openocd
$ wget https://raw.githubusercontent.com/renesas-rz/rzg_openocd/master/0001-tcl-target-renesas_rz_g2-Rename-to-renesas_rz-and-ad.patch
$ wget https://raw.githubusercontent.com/renesas-rz/rzg_openocd/master/0002-target-aarch64-MRS-MSR-support-for-system-register-a.patch
$ wget https://raw.githubusercontent.com/renesas-rz/rzg_openocd/master/0003-target-aarch64-enable-disable-mmu-new-commands.patch
$ wget https://raw.githubusercontent.com/renesas-rz/rzg_openocd/master/0004-target-aarch64-Add-code-to-invaldate-the-instruction.patch
$ chmod +x ./build_openocd
/* Avoid GIT error: server certificate verification failed */
$ export GIT_SSL_NO_VERIFY=1
$ ./build_openocd
Or manually follow the steps in that script:
The OpenOCD binaries can be found in the openocd/installdir/bin directory.
In the configuration, options that are commonly needed are --enable-ftdi to ensure ftdi related function (which Flyswatter2 uses) will be built. Same for J-Link, with --enable-jlink, however both should be recognized and added automatically during the configuration phase.
Note - The patch is not strictly needed. It slows down the download operations but it is required if an existing code in memory has to be replaced by using the JTAG.
Run OpenOCD
OpenOCD provides many setting scripts for many JTAG debugger and development boards under directory share/openocd/scripts/. Normally two suitable scripts has to be chosen, one for Debugger configuration and one for the development board or chip.
To debug with Flyswatter2 the following scripts is available:
interface/ftdi/flyswatter2.cfg
To debug with J-Link, instead:
interface/jlink.cfg
Then for the RZ family:
target/renesas_rz.cfg
Finally different commands have to be used to select different devices belonging to the RZ/G2 family:
- SMARC RZ/G2L board: set SOC G2L (default), i.e. -c can be omitted
- SMARC RZ/G2LC board: set SOC G2LC
- SMARC RZ/G2UL board: set SOC G2UL
- SMARC RZ/V2L board: set SOC V2L
- SMARC II RZ/G3S board: set SOC G3S
- EK874 RZ/G2E board: set SOC G2E
- HiHope RZ/G2M board: set SOC G2M
- HiHope RZ/G2N board: set SOC G2N
- HiHope RZ/G2H board: set SOC G2H
So, for example to run OpenOCD and attach to a RZ/G2L device using a Flyswatter 2 JTAG adapter:
$ cd installdir
$ sudo bin/openocd -f share/openocd/scripts/interface/ftdi/flyswatter2.cfg -c "set SOC G2L" -f share/openocd/scripts/target/renesas_rz.cfg
In case of RZ/Five:
$ cd installdir
$ sudo bin/openocd -f share/openocd/scripts/interface/ftdi/flyswatter2.cfg -f share/openocd/scripts/target/renesas_rz_five.cfg
Please note that there's a way to avoid the usage of sudo by making sure that both the user and the debugger devices used belong to the dialout/plugdev groups.
You can modify the renesas_rz_*.cfg configure file to tweak the clock speed (default 4MHz), for example to increase it to 15MHz:
adapter speed 15000
If openocd command succeeds, a message like these below appears:
Open On-Chip Debugger 0.12.0+dev-01565-g5622ada82 (2024-04-10-13:59)
Licensed under GNU GPL v2
For bug reports, read
	http://openocd.org/doc/doxygen/bugs.html
G2L
	G2L - 0 CA57(s), 2 CA55(s), 0 CA53(s),  0 CR7(s), 1 CM33(s)
	Boot Core - CA55

r9a07g044l.cpu
SMP targets: r9a07g044l.a55.0 r9a07g044l.a55.1
init_reset
Info : Listening on port 6666 for tcl connections
Info : Listening on port 4444 for telnet connections
Info : J-Link V10 compiled Jan 30 2023 11:28:07
Info : Hardware version: 10.10
Info : VTarget = 1.761 V
Info : clock speed 4000 kHz
Info : JTAG tap: r9a07g044l.cpu tap/device found: 0x6ba00477 (mfg: 0x23b (ARM Ltd), part: 0xba00, ver: 0x6)
Info : r9a07g044l.a55.0: hardware has 6 breakpoints, 4 watchpoints
Info : r9a07g044l.a55.0 cluster 0 core 0 multi core
Info : [r9a07g044l.a55.0] Examination succeed
Info : [r9a07g044l.axi_ap] Examination succeed
Info : starting gdb server for r9a07g044l.a55.0 on 3333
Info : Listening on port 3333 for gdb connections
Info : starting gdb server for r9a07g044l.m33 on 3334
Info : Listening on port 3334 for gdb connections
Info : gdb port disabled
Open On-Chip Debugger 0.11.0+dev-00663-gd1e14abdb-dirty (2022-05-10-07:54)
Licensed under GNU GPL v2
For bug reports, read
	http://openocd.org/doc/doxygen/bugs.html
r9A07g043u.cpu
Info : Listening on port 6666 for tcl connections
Info : Listening on port 4444 for telnet connections
Info : J-Link Lite V9 compiled Feb  2 2021 16:32:48
Info : Hardware version: 9.00
Info : VTarget = 1.819 V
Info : clock speed 4000 kHz
Info : JTAG tap: r9A07g043u.cpu tap/device found: 0x1000563d (mfg: 0x31e (Andes Technology Corporation), part: 0x0005, ver: 0x1)
Info : datacount=4 progbufsize=8
Info : Examined RISC-V core; found 1 harts
Info :  hart 0: XLEN=64, misa=0x800000000094312d
Info : starting gdb server for r9A07g043u.cpu on 3333
Info : Listening on port 3333 for gdb connections
Note that the "DAP transaction stalled" messages are normal and do not affect the functionality.
Start debugging
Now that openocd command has succeeded, you can use GDB on your Linux Host PC and attach to GDB Server created by OpenOCD. Note that on the Linux machine there might be several instances of GDB, including the native GDB (x86_64). In order to debug the Cortex-A55 the Arm AArch64 cross GDB has to be used, normally the one included in the SDK generated by Yocto, target: aarch64-poky-linux. For the Cortex-M33, instead the target has to be arm-none-eabi (to be installed separately).
$ source /opt/poky/3.1.5/environment-setup-aarch64-poky-linux
$ $GDB
GNU gdb (GDB) 9.1
Copyright (C) 2020 Free Software Foundation, Inc.
License GPLv3+: GNU GPL version 3 or later <http://gnu.org/licenses/gpl.html>
This is free software: you are free to change and redistribute it.
There is NO WARRANTY, to the extent permitted by law.
Type "show copying" and "show warranty" for details.
This GDB was configured as "--host=x86_64-pokysdk-linux '''--target=aarch64-poky-linux'''".
Type "show configuration" for configuration details.
For bug reporting instructions, please see:
<http://www.gnu.org/software/gdb/bugs/>.
Find the GDB manual and other documentation resources online at:
    <http://www.gnu.org/software/gdb/documentation/>.

For help, type "help".
Type "apropos word" to search for commands related to "word".
Instead of the gdb included in the SDK and generated by Yocto, you can also install a newer Arm toolchain, for example Version 13.2.Rel1 and launch the corresponding gdb:
$ aarch64-none-linux-gnu-gdb
GNU gdb (Arm GNU Toolchain 13.2.rel1 (Build arm-13.7)) 13.2.90.20231008-git
Copyright (C) 2023 Free Software Foundation, Inc.
License GPLv3+: GNU GPL version 3 or later <http://gnu.org/licenses/gpl.html>
This is free software: you are free to change and redistribute it.
There is NO WARRANTY, to the extent permitted by law.
Type "show copying" and "show warranty" for details.
This GDB was configured as "--host=x86_64-pc-linux-gnu --target=aarch64-none-linux-gnu".
Type "show configuration" for configuration details.
For bug reporting instructions, please see:
<https://bugs.linaro.org/>.
Find the GDB manual and other documentation resources online at:
    <http://www.gnu.org/software/gdb/documentation/>.

For help, type "help".
Type "apropos word" to search for commands related to "word".
(gdb)
In case of RISC-V there are different options, assuming the GDB that comes with Yocto SDK is used (riscv64-oe-linux-gdb):
$ source /opt/poky/oecore-x86_64/environment-setup-riscv64-oe-linux
$ $GDB
GNU gdb (GDB) 9.1
Copyright (C) 2020 Free Software Foundation, Inc.
License GPLv3+: GNU GPL version 3 or later <http://gnu.org/licenses/gpl.html>
This is free software: you are free to change and redistribute it.
There is NO WARRANTY, to the extent permitted by law.
Type "show copying" and "show warranty" for details.
This GDB was configured as "--host=x86_64-oesdk-linux --target=riscv64-oe-linux".
Type "show configuration" for configuration details.
For bug reporting instructions, please see:
<http://www.gnu.org/software/gdb/bugs/>.
Find the GDB manual and other documentation resources online at:
    <http://www.gnu.org/software/gdb/documentation/>.

For help, type "help".
Type "apropos word" to search for commands related to "word".
Different ports are potentially created for the different cores available in the device. For the example above GDB can connect to the port 3333 for the Cortex-A55 (configured in SMP by default) or RISC-V Andes AX45MP and port 3334 for the Cortex-M33.
(gdb) target remote localhost:3333
Remote debugging using localhost:3333
warning: No executable has been specified and target does not support
determining executable automatically.  Try using the "file" command.
0x0000000050000000 in ?? ()
(gdb)
A message similar to the one shown above means that GDB managed to connect to the target and it is ready to accept further commands to debug.
Printf style debugging using OpenOCD
Normally once you have OpenOCD and Eclipse running and you can enjoy the modern features to debug your code: breakpoints, watchpoints, stepping thru the code, etc.
However in some circumstances (legacy, no UART, etc) you may still want to use printf to debug the code using the JTAG interface.
As of today expensive debug tools like Lauterbach do fully support the so called Arm semihosting, actually most of debug tools do support Arm semihosting for 32-bit targets. However there are very few tools that can support AArch64 semihosting. AArch64 is a completely new architecture and semihosting has been redefined and specified in much more detail. So apart from Lauterbach, OpenOCD is one of the few tools that can fully support AArch64 semihosting.
If you used semihosting in the past, enabling it for AArch64 is not that different:
- the project shall use the standard Arm C libraries
- any IO function like _write or _read, as well as syscalls shall be excluded from the build
- --specs=rdimon.specs shall be used as linker flag
initialise_monitor_handles()function shall be called before using standard input / output function only once. In doing so,<stdio.h>and<stdlib.h>shall be included andvoid initialise_monitor_handles (void)shall be declared as anextern
After the call initialise_monitor_handles() function, any printf or scanf function can be used and they will be redirected to the OpenOCD debugger window. As per AArch64 specification, eventually any scanf/printf will end up in a hlt 0xf000 instruction, that is "captured" by OpenOCD and handled accordingly. It's worth noting that semihosting shall be enabled in OpenOCD using the command: arm semihosting enable.
For example, for a bare metal Hello World application with semihosting enabled (TODO: Hello World bare metal example), this simple gdb script can be used (manually reset the target first):
target remote localhost:3333
mon halt
mon arm semihosting enable
set $pc = 0x12000
c
This assumes that the application entry point is located at 0x12000.
The OpenOCD output on the RZ/G2L will be something like:
Info : DAP transaction stalled (WAIT) - slowing down
Info : DAP transaction stalled during replay (WAIT) - resending
Info : DAP transaction stalled (WAIT) - slowing down
Info : r9a07g044l.a55.0: hardware has 6 breakpoints, 4 watchpoints
r9a07g044l.a55.0 halted in AArch64 state due to debug-request, current mode: EL3H
cpsr: 0x400003cd pc: 0x20021f40, semihosting
MMU: disabled, D-Cache: disabled, I-Cache: disabled
Info : DAP transaction stalled (WAIT) - slowing down
Info : DAP transaction stalled during replay (WAIT) - resending
Info : DAP transaction stalled (WAIT) - slowing down
Info : DAP transaction stalled (WAIT) - slowing down
Info : DAP transaction stalled (WAIT) - slowing down
Info : DAP transaction stalled (WAIT) - slowing down
Info : DAP transaction stalled (WAIT) - slowing down
Info : DAP transaction stalled (WAIT) - slowing down
Hello World!


