TES Guiliani: Difference between revisions
No edit summary |
|||
| Line 18: | Line 18: | ||
* GNU MCU Eclipse Windows Build Tools (2.9-20170629-1013) | * GNU MCU Eclipse Windows Build Tools (2.9-20170629-1013) | ||
=== Import | === Import and Build Projects === | ||
# Download the project from the Tes Guiliani Download page | #Download the project from the Tes Guiliani Download page | ||
# Extract the download archive. | #Extract the download archive. | ||
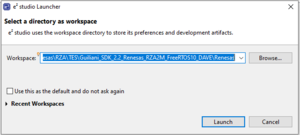
# Start e2studio IDE. The following dialog is displayed to select the project workspace directory. For the Tes Guiliani Demos select the Renesas subdirectory in the extracted folder. | #Start e2studio IDE. The following dialog is displayed to select the project workspace directory. For the Tes Guiliani Demos select the Renesas subdirectory in the extracted folder (i.e. D:\Renesas\RZA\TES\Guiliani_SDK_2.2_Renesas_RZA2M_FreeRTOS10_DAVE\Renesas). | ||
[[File:e2studio_workspace_selection_dialog.png|alt=|frameless]] | |||
# <li value="4">Import the projects | |||
= Display Setup = | =Display Setup = | ||
=== RZA2M Demos === | ===RZA2M Demos=== | ||
By default the RZA2M demos are setup for HDMI and Mouse using the added display output board. This can be changed by doing the following if you ordered the direct connect LCD to the evaluation kit. | By default the RZA2M demos are setup for HDMI and Mouse using the added display output board. This can be changed by doing the following if you ordered the direct connect LCD to the evaluation kit. | ||
# Open the lcd_panel.h header file this is located in the BSP project ( src/Renesas/inc). | # Open the lcd_panel.h header file this is located in the BSP project ( src/Renesas/inc). | ||
# Change the preprocessor LCD_PANEL to LCD_PANEL_RSK | #Change the preprocessor LCD_PANEL to LCD_PANEL_RSK | ||
# Recompile the BSP and SR_GulianiDemo. You need to make sure that the BSP and SR_GuilianiDemo project configuration is set to Debug. Also clean both projects before build. | #Recompile the BSP and SR_GulianiDemo. You need to make sure that the BSP and SR_GuilianiDemo project configuration is set to Debug. Also clean both projects before build. | ||
=Bootloader Support= | |||
Revision as of 22:56, 11 May 2021
<img src=" " style="float:right" height="120">
Introduction
This page provides engineering information about using the TES Guiliani Demos posted on Tes Website.
Demo Quick Start Guide
Prerequisites
- Installed Guiliani SDK for Renesas RZ/A2M
- Installed e2Studio V7.8 (version 7.8.0 is recommended)
- Installed Launchpad Toolchain 6-2017-q2-update
- Installed Libgen Update for GNU ARM Embedded Toolchains (at least Version 1.2018.02)
- GNU MCU Eclipse Windows Build Tools (2.9-20170629-1013)
Import and Build Projects
- Download the project from the Tes Guiliani Download page
- Extract the download archive.
- Start e2studio IDE. The following dialog is displayed to select the project workspace directory. For the Tes Guiliani Demos select the Renesas subdirectory in the extracted folder (i.e. D:\Renesas\RZA\TES\Guiliani_SDK_2.2_Renesas_RZA2M_FreeRTOS10_DAVE\Renesas).
- Import the projects
Display Setup
RZA2M Demos
By default the RZA2M demos are setup for HDMI and Mouse using the added display output board. This can be changed by doing the following if you ordered the direct connect LCD to the evaluation kit.
- Open the lcd_panel.h header file this is located in the BSP project ( src/Renesas/inc).
- Change the preprocessor LCD_PANEL to LCD_PANEL_RSK
- Recompile the BSP and SR_GulianiDemo. You need to make sure that the BSP and SR_GuilianiDemo project configuration is set to Debug. Also clean both projects before build.


