RZ-G/RZ-G2L SMARC: Difference between revisions
| Line 9: | Line 9: | ||
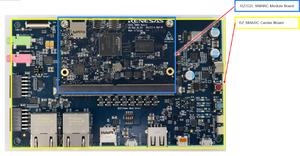
** 📄 [https://www.renesas.com/us/en/document/ovr/rzg2l-evaluation-kit-carrier-board-specification-overview?language=en Evaluation Kit - SMARC Carrier Board Specification Overview ] | ** 📄 [https://www.renesas.com/us/en/document/ovr/rzg2l-evaluation-kit-carrier-board-specification-overview?language=en Evaluation Kit - SMARC Carrier Board Specification Overview ] | ||
* Linux Board Support Package Download | * Linux Board Support Package Download | ||
** [https://www.renesas.com/us/en/products/microcontrollers-microprocessors/rz-arm-based-high-end-32-64-bit-mpus/rzg2l-board-support-package-419-cip Official BSP Download Page] | |||
** Please refer to the '''[https://www.renesas.com/us/en/products/microcontrollers-microprocessors/rz-arm-based-high-end-32-64-bit-mpus/rzg2l-board-support-package-419-cip Linux BSP page]''' and read the '''Release Note''' document for the BSP build instructions | ** Please refer to the '''[https://www.renesas.com/us/en/products/microcontrollers-microprocessors/rz-arm-based-high-end-32-64-bit-mpus/rzg2l-board-support-package-419-cip Linux BSP page]''' and read the '''Release Note''' document for the BSP build instructions | ||
* Additional Help | * Additional Help | ||
Revision as of 12:04, 2 July 2021
← RZ-G
General Information
- Official RZ/G2L Website
- Please review the Documentation & Downloads section
- Board Documentation
- Linux Board Support Package Download
- Official BSP Download Page
- Please refer to the Linux BSP page and read the Release Note document for the BSP build instructions
- Additional Help
- A script for programming the boot loaders into SPI Flash can be found here: https://github.com/seebe/rzg_stuff/blob/master/boards/rzg2l_smarc/README.md
- Articles
Board Setup Information
Board Operation Information
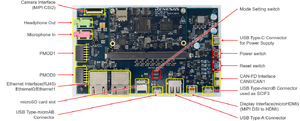
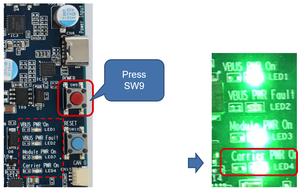 Power ON ● Connect USB-PD Power Charger to USB Type-C Connector. Then LED1(VBUS PWR On) and LED3(Module PWR On) lights up. ● Press SW9 to turn on the power. Then LED4(Carrier PWR On) lights up. |
 Debug Serial (Console Output) ● Debug serial uses CN14. The baud rate is 115200bps. ● Since the serial-USB conversion IC is not always powered, the Windows PC will recognize it after the power switch is turned on. ● If it is not recognized by your Windows PC, please install the driver�https://www.ftdichip.com/Drivers/VCP.htm |


