RZ-G/RZ-G2L SMARC: Difference between revisions
(added gstreamer commands for capturing .jpg and .mp4) |
|||
| (77 intermediate revisions by 5 users not shown) | |||
| Line 1: | Line 1: | ||
{{DISPLAYTITLE:RZ/G2L, RZ/G2LC, RZ/G2UL SMARC Board by Renesas}} | {{DISPLAYTITLE:RZ/G2L, RZ/G2LC, RZ/G2UL SMARC Board by Renesas}} | ||
<img height="200" style="float:right" src=http://linuxgizmos.com/files/renesas_rzg2l_carrier.jpg> | <html><img height="200" style="float:right" src=http://linuxgizmos.com/files/renesas_rzg2l_carrier.jpg></html> | ||
← [[RZ-G]] | ← [[RZ-G]] | ||
<big>📌'''This page is for the RZ/G2L, RZ/G2LC RZ/G2UL evaluation boards.'''</big> | <big>📌'''This page is for the RZ/G2L, RZ/G2LC, and RZ/G2UL evaluation boards.'''</big> | ||
= General Information = | = General Information = | ||
| Line 9: | Line 9: | ||
** [https://www.renesas.com/us/en/products/microcontrollers-microprocessors/rz-arm-based-high-end-32-64-bit-mpus/rzg2l-general-purpose-microprocessors-dual-core-arm-cortex-a55-12-ghz-cpus-3d-graphics-and-video-codec Official Renesas RZ/G2L Device Website (link) ] | ** [https://www.renesas.com/us/en/products/microcontrollers-microprocessors/rz-arm-based-high-end-32-64-bit-mpus/rzg2l-general-purpose-microprocessors-dual-core-arm-cortex-a55-12-ghz-cpus-3d-graphics-and-video-codec Official Renesas RZ/G2L Device Website (link) ] | ||
** [https://www.renesas.com/us/en/products/microcontrollers-microprocessors/rz-arm-based-high-end-32-64-bit-mpus/rtk9744l23s01000be-rzg2l-evaluation-board-kit Official RZ/G2L Evaluation Board Kit Website (link)] | ** [https://www.renesas.com/us/en/products/microcontrollers-microprocessors/rz-arm-based-high-end-32-64-bit-mpus/rtk9744l23s01000be-rzg2l-evaluation-board-kit Official RZ/G2L Evaluation Board Kit Website (link)] | ||
** [https://www.renesas.com/document/gde/rzg2l-rzg2lc-easy-download-guide?language=en Easy Download Guide for RZ/G2L and RZ/G2LC (link)] - A single PDF file that lists all the available downloads on renesas.com. | |||
** RZ/G2L Evaluation Kit Ordering Part Number: RTK9744<font color=red>L23</font>S01000BE | |||
* '''RZ/G2LC''' | * '''RZ/G2LC''' | ||
** [https://www.renesas.com/us/en/products/microcontrollers-microprocessors/rz-mpus/rzg2lc-general-purpose-microprocessors-dual-core-arm-cortex-a55-12-ghz-cpus-3d-graphics Official Renesas RZ/G2LC Device Website (link) ] | ** [https://www.renesas.com/us/en/products/microcontrollers-microprocessors/rz-mpus/rzg2lc-general-purpose-microprocessors-dual-core-arm-cortex-a55-12-ghz-cpus-3d-graphics Official Renesas RZ/G2LC Device Website (link) ] | ||
** [https://www.renesas.com/us/en/products/microcontrollers-microprocessors/rz-arm-based-high-end-32-64-bit-mpus/rtk9744c22s01000be-rzg2lc-evaluation-board-kit Official RZ/G2LC Evaluation Board Kit Website] | ** [https://www.renesas.com/us/en/products/microcontrollers-microprocessors/rz-arm-based-high-end-32-64-bit-mpus/rtk9744c22s01000be-rzg2lc-evaluation-board-kit Official RZ/G2LC Evaluation Board Kit Website] | ||
** [https://www.renesas.com/document/gde/rzg2l-rzg2lc-easy-download-guide?language=en Easy Download Guide for RZ/G2L and RZ/G2LC (link)] - A single PDF file that lists all the available downloads on renesas.com. | |||
** RZ/G2LC Evaluation Kit Ordering Part Number: RTK9744<font color=red>C22</font>S01000BE | |||
* '''RZ/G2UL''' | * '''RZ/G2UL''' | ||
** [https://www.renesas.com/us/en/products/microcontrollers-microprocessors/rz-mpus/rzg2ul-general-purpose-microprocessors-single-core-arm-cortex-a55-10-ghz-cpu-2ch-giga-bit-ethernet Official Renesas RZ/G2UL Device Website (link) ] | ** [https://www.renesas.com/us/en/products/microcontrollers-microprocessors/rz-mpus/rzg2ul-general-purpose-microprocessors-single-core-arm-cortex-a55-10-ghz-cpu-2ch-giga-bit-ethernet Official Renesas RZ/G2UL Device Website (link) ] | ||
** [https://www.renesas.com/us/en/products/microcontrollers-microprocessors/rz-mpus/rtk9743u11s01000be-rzg2ul-evaluation-board-kit Official RZ/G2UL Evaluation Board Kit Website (link)] | ** [https://www.renesas.com/us/en/products/microcontrollers-microprocessors/rz-mpus/rtk9743u11s01000be-rzg2ul-evaluation-board-kit Official RZ/G2UL Evaluation Board Kit Website (link)] | ||
** [https://www.renesas.com/us/en/document/gde/rzg2ul-easy-download-guide?language=en Easy Download Guide for RZ/G2UL (link)] - A single PDF file that lists all the available downloads on renesas.com. | |||
** RZ/G2UL Evaluation Kit Ordering Part Number: RTK9744<font color=red>U11</font>S01000BE | |||
** https://www.renesas.com/document/gde/ | ** There are 2 RZ/G2UL derivates: | ||
*** Type1: | |||
**** pin compatible with RZ/A3UL and RZ/Five. | |||
** | **** given on the RZ/G2UL EVK. | ||
** | **** part numbers: | ||
** | ***** R9A07G043U11GBG (without security) | ||
* | ***** R9A07G043U15GBG (with security) | ||
** | *** Type2: | ||
* | **** pin compatible with RZ/G2LC | ||
**** A RZ/G2UL Type2 EVK is not available for purchase. For evaluation, it's recommended to use the RZ/G2UL Type1 or the RZ/G2LC EVK. | |||
** [http://linuxgizmos.com/renesas-adds-to-rz-g2-line-with-three-cortex-a55-socs Renesas adds to RZ/G2 line with three Cortex-A55 SoCs] | **** RZ/G2UL VLP releases are prepared for the RZ/G2UL Type1 EVK. RZ/G2UL Type2 specific modifications are mentioned here: [https://renesas.info/wiki/RZ-G/RZ-G2L_SMARC#RZ/G2UL_Type2_VLP RZ/G2UL Type2 VLP (link)] | ||
****part numbers: | |||
*****R9A07G043U12GBG (without security) | |||
*****R9A07G043U16GBG (with security) | |||
*'''Articles''' | |||
**[http://linuxgizmos.com/renesas-adds-to-rz-g2-line-with-three-cortex-a55-socs Renesas adds to RZ/G2 line with three Cortex-A55 SoCs] | |||
= | =Getting Started= | ||
<html><img height="200" style="float:right" src=https://www.renesas.com/sites/default/files/rtk9744l23s01000be-rzg2l-evaluation-board-kit_0.jpg></html> | |||
'''📄 Board User Manual''' | |||
*The User Manual for the boards can be found their website pages on renesas.com. | |||
*Check the 'General Information' section on this page for the links. | |||
'''📦 What is included in the kit''' | |||
*A Micro USB cable for serial console. | |||
'''🛒 What you will need to purchase''' | |||
*'''Power:''' (Required) USB Type-C power supply. 5V or 9V can be used. To use 9V, switch SW11-4 change is needed (please see the board manual). | |||
* '''HDMI LCD:''' An LCD monitor with an HMDI input. Here is a list of tested touchscreen monitors: [[RZ-G/RZ-G2L_SMARC#LCD_Monitors]] | |||
* '''mini-HDMI Adapter:''' The connector on the board is type mini-HDMI. | |||
*'''USB Camera:''' A camera supporting USB Video Class (UVC) such as Logitec C270, C920, C922, BRIO Ultra HD Pro. | |||
* '''USB Mouse:''' In the case that you do not have a touchscreen LCD monitor. | |||
'''⭐ Pre-Built Binaries ⭐''' | |||
* If you prefer to program pre-built binaries into your board, you can download them from renesas.com | |||
* The package includes a complete SD Card image that can be written using Windows or Linux. | |||
* Boot loaders are also included in the package. | |||
* On the [https://www.renesas.com/us/en/products/microcontrollers-microprocessors/rz-mpus/rzg-linux-platform/rzg-marketplace/verified-linux-package/rzg-verified-linux-package RZ/G Verified Linux Package [5.10-CIP] ] BSP download page, look for "Pre-built Images" downloads for RZ/G2L, RZ/G2LC, RZ/G2UL. | |||
* ⚠️ '''The instructions in the package for v3.0.5 are wrong and incomplete.''' Please use these instead. | |||
For a Windows PC: | |||
1. Use [https://www.7-zip.org/ 7-Zip] to extract/convert the .wic file ( core-image-qt-smarc-rzg2l<font color=red>.wic.gz</font> → core-image-qt-smarc-rzg2l<font color=red>.wic</font> ) | |||
2. Use [https://etcher.balena.io Balena Etcher] to program the <font color=red>.wic</font> file into and SD Card. The card needs to be '''4GB''' or larger. | |||
3. Insert the '''SD card''' into the socket on '''Carrier Board'''. | |||
<pre style="background-color:#FFFFFF; border:0px"> | |||
┌─────┬─────┬─────┐ | |||
│ │ SOM │ │ | |||
│ └─────┘ │ | |||
│ Carrier Board │ | |||
│ ┌─┐ │ | |||
└─────┴─┴─────────┘ | |||
↑ | |||
SD Card Socket | |||
</pre> | |||
4. Power the board and connect a terminal program (like [https://teratermproject.github.io/index-en.html Tera Term]) to the USB-Serial connect. The Baud is 115,200. Stop the autoboot by pressing the space board on your keyboard before the count down stops. Note, even if you don't press the space, you will be OK because the auto-boot will fail and will leave you at the u-boot prompt " => " | |||
5. Copy/paste these commands below (without the " => ") to create and save a new boot command. | |||
<pre> | |||
=> setenv sd_boot1 'mmc dev 1 ; ext4load mmc 1:2 0x48080000 /boot/Image ; ext4load mmc 1:2 0x48000000 /boot/r9a07g044l2-smarc.dtb' | |||
'' | => setenv sd_boot2 'setenv bootargs 'root=/dev/mmcblk1p2 rootwait' ; booti 0x48080000 - 0x48000000' | ||
'' | => setenv bootcmd 'run sd_boot1 sd_boot2' | ||
=> saveenv | |||
</pre> | |||
6. Reset your board with the blue button, and it should now count down and then automatically boot into Linux. The Linux username will be "root", no password is needed. | |||
''' | '''💻 Build Environment''' | ||
* To build the BSP, you will need a Linux PC running '''Ubuntu 20.04'''. | <center><div style="padding: 2px; border: 2px solid maroon; margin: 0;"> | ||
* You can use a Linux PC (recommended) or a Virtual Machine. If using a Virtual Machine, 200GB of hard drive space is recommended. | <font size=+1>⚠️ The BSP will only build in Ubuntu 20.04</font></div> | ||
</center> | |||
*To build the BSP, you will need a Linux PC running '''Ubuntu 20.04'''. This was the only host OS that was tested and that specific version is a requirement of Yocto 3.1 (dunfell). '''Using Ubuntu <font color=red>22.04</font> will not work''' | |||
*You can use a Linux PC (recommended) or a Virtual Machine. If using a Virtual Machine, 200GB of hard drive space is recommended for the minimum build. | |||
*If you are '''not currently running Ubuntu 20.04''', you can use a '''[https://www.docker.com/ docker container]'''. | |||
** Example: Host Machine = Ubuntu 22.04 + Docker Container running Ubuntu 20.04 inside of it | |||
* Some docker setup instructions and scripts are provided to make it easy to get started. | |||
** https://github.com/renesas-rz/docker_setup | |||
''' | '''💾 Downloading the Linux BSP''' | ||
* | *Download the RZ/G2L Board Support Package from renesas.com. '''Links''' to all the downloads can be found on the '''[https://renesas.info/wiki/RZ-G/RZ-G2_BSP 📦 RZ/G2 Linux BSP]''' on this site. Please refer to the sections that support RZ/G2L. | ||
*The '''Linux-5.10 BSP''' is recommended. | |||
* | *You will need to downloaded multiple packages for the full build. You will need to download the "RZ/G2L Mali Graphic Library" package to '''enable graphics''' and "RZ/G2L Codec Library" package to '''enable video encode/decode'''. | ||
* | |||
''' | '''🔨 Building the BSP''' | ||
* The | * '''Build Instructions:''' The instructions for building the BSP are located in the '''Release Note''' document that is included in the ZIP file download from renesas.com. | ||
*'''Board Versions:''' There are currently '''3 versions of RZ/G2L boards''' (WS1-Discrete, WS2-Discrete, WS2-PMIC). Please review section [[RZ-G/RZ-G2L_SMARC#Board_Version_Identification|Board Version Identification]] above. There is only 1 version of RZ/G2LC board. There is only 1 version of RZ/G2UL board. If you have a RZ/G2L 'WS1' board (very rare), please review section 6 in the 'Release Note' of the BSP in detail before following the instructions in section 3. | |||
*'''Graphics Libraries:''' If you are building core-image-weston or core-image-qt, you need to add '''Mali Graphics library''' mentioned in step 1. Note that RZ/GUL and RZ/Five do not have a GPU, so you cannot run Weston or Qt. | |||
*'''Enable Qt Demos:''' To build the Qt demos (core-image-qt) you must edit the file build/conf/local.conf and remove the comment marker # to set QT_DEMO = "1" . Please build (bitbake) core-image-weston first, then bitbake core-image-qt. If you buid core-image-qt first, you will get an error. Also, if you get a build error, just keep running the bitbake command again until it completes (there seems to be some issue in the order that packages build). | |||
*'''Hint:''' To make the build '''faster''', you can copy the '''downloads''' directory from an older BSP (rzg2l_bsp_vx.xx.0/build/downloads -> rzg2l_bsp_vx.xx.1/build/downloads) to skip downloading the same open source packages again. | |||
* | '''⚡ Programing the Board''' | ||
*The instructions for setting up and programming the board are located in the '''Board Start-up Guide''' that comes in the BSP download package | |||
*A script for automating the programming the boot loaders into Flash can be found here: https://github.com/renesas-rz/rzg2_bsp_scripts/tree/master/flash_writer_tool | |||
* | =SD Card Loading and Booting= | ||
* These instructions are for using the output files from the Yocto build to prepare an SD Card and boot into Linux. | |||
* The evaluation boards boot from SPI Flash (boot loaders), then can run Linux from either eMMC on the board or an external SD Card. | |||
==Format the SD Card== | |||
*The SD Card must be formatted by a Linux PC, and contain 2 partitions: | |||
** Partition 1 = FAT16 | |||
** Partition 2 = ext4 | |||
*A helpful script has been created '''([https://github.com/renesas-rz/rzg2_bsp_scripts/tree/master/usb_sd_partition usb_sd_partition])''' that you can run on your Linux PC. | |||
**Insert your micro SD card into a '''USB-SD-Card reader''' and then plug into a Linux PC. | |||
**Use the commands below to download the formatting script from github and run. Please select your card and choose the default settings. | |||
<pre> | <pre> | ||
$ wget https://raw.githubusercontent.com/renesas-rz/rzg2_bsp_scripts/master/usb_sd_partition/usb_sd_partition.sh | $ wget https://raw.githubusercontent.com/renesas-rz/rzg2_bsp_scripts/master/usb_sd_partition/usb_sd_partition.sh | ||
| Line 83: | Line 139: | ||
$ ./usb_sd_partition.sh | $ ./usb_sd_partition.sh | ||
</pre> | </pre> | ||
* Use the commands below to copy the files you build with the BSP to the SD card. '''Start in the base of your Yocto BSP'''. | <br> | ||
==Copy files to SD Card== | |||
*Use the commands below to copy the files you build with the BSP to the SD card. '''Start in the base of your Yocto BSP'''. | |||
*Choose the correct command for RZ/G2L or RZ/G2LC or RZ/G2UL | |||
<pre> | <pre> | ||
# Change to the Yocto output directory that contains the files | # Change to the Yocto output directory that contains the files | ||
$ cd build/tmp/deploy/images/smarc-rzg2l # RZ/G2L | |||
$ cd build/tmp/deploy/images/smarc-rzg2l | $ cd build/tmp/deploy/images/smarc-rzg2lc # RZ/G2LC | ||
$ cd build/tmp/deploy/images/smarc-rzg2ul # RZ/G2UL | |||
# Copy the Linux kernel to partition 1 | |||
$ sudo cp -v Image-smarc-rzg2l.bin /media/$USER/RZ_FAT # RZ/G2L | |||
$ sudo cp -v Image-smarc-rzg2lc.bin /media/$USER/RZ_FAT # RZ/G2LC | |||
$ sudo cp -v Image-smarc-rzg2ul.bin /media/$USER/RZ_FAT # RZ/G2UL | |||
# Copy the | # Copy the Device Tree to partition 1 | ||
$ sudo cp -v Image | $ sudo cp -v Image-r9a07g044l2-smarc.dtb /media/$USER/RZ_FAT # RZ/G2L | ||
$ sudo cp -v Image-r9a07g044c2-smarc.dtb /media/$USER/RZ_FAT # RZ/G2LC | |||
$ sudo cp -v r9a07g044c2-smarc.dtb /media/$USER/RZ_FAT # RZ/G2LC | $ sudo cp -v Image-r9a07g043u11-smarc.dtb /media/$USER/RZ_FAT # RZ/G2UL | ||
$ sudo cp -v | |||
# Copy and expand the Root File System to partition 2 | # Copy and expand the Root File System to partition 2 | ||
| Line 100: | Line 165: | ||
$ sudo tar -xvf core-image-minimal-smarc-rzg2ul.tar.gz -C /media/$USER/RZ_ext # RZ/G2UL | $ sudo tar -xvf core-image-minimal-smarc-rzg2ul.tar.gz -C /media/$USER/RZ_ext # RZ/G2UL | ||
(or if using graphics) | (or if using graphics) | ||
$ sudo tar -xvf core-image-weston-smarc-rzg2l.tar.gz -C /media/$USER/RZ_ext | $ sudo tar -xvf core-image-weston-smarc-rzg2l.tar.gz -C /media/$USER/RZ_ext # RZ/G2L | ||
$ sudo tar -xvf core-image-weston-smarc-rzg2lc.tar.gz -C /media/$USER/RZ_ext # RZ/G2LC | $ sudo tar -xvf core-image-weston-smarc-rzg2lc.tar.gz -C /media/$USER/RZ_ext # RZ/G2LC | ||
$ sudo tar -xvf core-image- | $ sudo tar -xvf core-image-bsp-smarc-rzg2ul.tar.gz -C /media/$USER/RZ_ext # RZ/G2UL | ||
# Make sure all files are finished writing before removing the USB card reader from the PC | # Make sure all files are finished writing before removing the USB card reader from the PC | ||
| Line 108: | Line 173: | ||
</pre> | </pre> | ||
* Safely remove your USB card reader by right clicking on the drive icon (either RZ_FAT or RZ_ext) in Ubuntu and selecting "Eject" | *Safely remove your USB card reader by right clicking on the drive icon (either RZ_FAT or RZ_ext) in Ubuntu and selecting "Eject" | ||
==Switch settings for the CPU SOM board.== | |||
* The SOM board contains a eMMC Flash device and a Micro SD Card socket. On the SOM board, you can only use one or the other because they are both connected to the same peripheral channel on the RZ/G2L. | *The SOM board contains a eMMC Flash device and a Micro SD Card socket. On the SOM board, you can only use one or the other because they are both connected to the same peripheral channel on the RZ/G2L. | ||
* ⚠️ u-boot environment variables are always stored in eMMC Flash (not SPI flash). This means if you change switch SW1-2 to ON on the SOM board, you cannot access saved u-boot environments variables and you will always get the message "*** Warning - MMC init failed, using default environment" | *⚠️ u-boot environment variables are always stored in eMMC Flash (not SPI flash). This means if you change switch SW1-2 to ON on the SOM board, you cannot access saved u-boot environments variables and you will always get the message "*** Warning - MMC init failed, using default environment" | ||
* Note that the SD Card slot on the Carrier board will always work regardless of the setting of SW1-2 because it uses a separate peripheral channel on the RZ/G2L. | *Note that the SD Card slot on the Carrier board will always work regardless of the setting of SW1-2 because it uses a separate peripheral channel on the RZ/G2L. | ||
* On the SOM (CPU) board, there is a little switch (SW1) near the SD card socket. | *On the SOM (CPU) board, there is a little switch (SW1) near the SD card socket. | ||
* Use the '''Recommended Settings''' below. It is the default of how the board was shipped. | *Use the '''Recommended Settings''' below. It is the default of how the board was shipped. | ||
<pre> | <pre> | ||
[Recommended Settings] [Advanced Users Only] | [Recommended Settings] [Advanced Users Only] | ||
| Line 129: | Line 194: | ||
</pre> | </pre> | ||
==Power the Board and Connect to the Serial Port == | |||
* On the '''Carrier Board''', set switches '''SW11''' as follows because the boot loaders are stored in QSPI Flash. | *On the '''Carrier Board''', set switches '''SW11''' as follows because the boot loaders are stored in QSPI Flash. | ||
<pre> | <pre> | ||
SW11-1 = OFF | SW11-1 = OFF | ||
| Line 142: | Line 207: | ||
| 1 2 3 4 | | | 1 2 3 4 | | ||
+---------+ | +---------+ | ||
</pre> | </pre> | ||
* Supply power the board using the '''USB-C connection''' on the carrier board labeled "Power Input" | *'''Supply power''' the board using the '''USB-C connection''' on the carrier board labeled "Power Input". You will only see 2 green LEDs lit. | ||
* On the carrier board, | *On the carrier board, '''press and hold the <span style="color:red">red</span> power button for 2 seconds''' to turn ON (or OFF) power to the board. The green LED labeled "Carrier PWR On" will be lit when power is on (making a total of 3 green LEDs lit). | ||
* Now that the board is powered, plug a USB micro cable into the carrier board to the USB connector labeled '''"SER 3 UART"'''. Use a '''serial terminal program''' to interact as you board. With a Linux PC, we recommend using "putty" (connects to /dev/USB0), and with a Windows PC we recommend "TeraTerm" that connects to COMx. The baud rate of the Serial connection is '''115200 bps'''. | *Now that the board is powered and the onboard USB-to-Serial chip is also powered, plug a USB micro cable into the carrier board to the USB connector labeled '''"SER 3 UART"'''. Use a '''serial terminal program''' to interact as you board. With a Linux PC, we recommend using "putty" (connects to /dev/USB0), and with a Windows PC we recommend "TeraTerm" that connects to COMx. The baud rate of the Serial connection is '''115200 bps'''. | ||
* Press the '''blue reset button''', and then "u-boot" will start. Within 3 seconds, '''press the space bar''' on your keyboard in order to stop the auto-boot sequence. | *Press the '''blue reset button''', and then "u-boot" will start. Within 3 seconds, '''press the space bar''' on your keyboard in order to stop the auto-boot sequence. | ||
==Insert SD Card and Boot== | |||
* Insert the '''SD card''' into the socket on '''Carrier Board'''. | *Insert the '''SD card''' into the socket on '''Carrier Board'''. | ||
<pre style="background-color:#FFFFFF; border:0px"> | <pre style="background-color:#FFFFFF; border:0px"> | ||
┌─────┬─────┬─────┐ | ┌─────┬─────┬─────┐ | ||
| Line 160: | Line 225: | ||
SD Card Socket | SD Card Socket | ||
</pre> | </pre> | ||
* Press the '''blue reset button''', and then "u-boot" will start. Within 3 seconds, '''press the space bar''' on your keyboard in order to stop the auto-boot sequence. | *Press the '''blue reset button''', and then "u-boot" will start. Within 3 seconds, '''press the space bar''' on your keyboard in order to stop the auto-boot sequence. | ||
* At the u-boot prompt ( => ), enter the following commands to boot the board. | *At the u-boot prompt ( => ), enter the following commands to boot the board. | ||
* ⚠️ If you get an failure when saving with "saveenv", remove power to the board and try again. | *⚠️ If you get an failure when saving with "saveenv", remove power to the board and try again. | ||
'''RZ/G2L EVK Booting Commands:''' | '''RZ/G2L EVK Booting Commands:''' | ||
<pre> | <pre> | ||
# Create command macros and save them: | # Create command macros and save them: | ||
=> setenv sd_boot1 'mmc dev 1 ; fatload mmc 1:1 0x48080000 Image ; fatload mmc 1:1 0x48000000 /r9a07g044l2-smarc.dtb' | => setenv sd_boot1 'mmc dev 1 ; fatload mmc 1:1 0x48080000 Image-smarc-rzg2l.bin ; fatload mmc 1:1 0x48000000 /Image-r9a07g044l2-smarc.dtb' | ||
=> setenv sd_boot2 'setenv bootargs 'root=/dev/mmcblk1p2 rootwait' ; booti 0x48080000 - 0x48000000' | => setenv sd_boot2 'setenv bootargs 'root=/dev/mmcblk1p2 rootwait' ; booti 0x48080000 - 0x48000000' | ||
=> setenv bootcmd 'run sd_boot1 sd_boot2' | => setenv bootcmd 'run sd_boot1 sd_boot2' | ||
| Line 175: | Line 240: | ||
<pre> | <pre> | ||
# Create command macros and save them: | # Create command macros and save them: | ||
=> setenv sd_boot1 'mmc dev 1 ; fatload mmc 1:1 0x48080000 Image ; fatload mmc 1:1 0x48000000 /r9a07g044c2-smarc.dtb' | => setenv sd_boot1 'mmc dev 1 ; fatload mmc 1:1 0x48080000 Image-smarc-rzg2lc.bin ; fatload mmc 1:1 0x48000000 /Image-r9a07g044c2-smarc.dtb' | ||
=> setenv sd_boot2 'setenv bootargs 'root=/dev/mmcblk1p2 rootwait' ; booti 0x48080000 - 0x48000000' | => setenv sd_boot2 'setenv bootargs 'root=/dev/mmcblk1p2 rootwait' ; booti 0x48080000 - 0x48000000' | ||
=> setenv bootcmd 'run sd_boot1 sd_boot2' | => setenv bootcmd 'run sd_boot1 sd_boot2' | ||
| Line 184: | Line 249: | ||
<pre> | <pre> | ||
# Create command macros and save them: | # Create command macros and save them: | ||
=> setenv sd_boot1 'mmc dev 1 ; fatload mmc 1:1 0x48080000 Image ; fatload mmc 1:1 0x48000000 / | => setenv sd_boot1 'mmc dev 1 ; fatload mmc 1:1 0x48080000 Image-smarc-rzg2ul.bin ; fatload mmc 1:1 0x48000000 /Image-r9a07g043u11-smarc.dtb' | ||
=> setenv sd_boot2 'setenv bootargs 'root=/dev/mmcblk1p2 rootwait' ; booti 0x48080000 - 0x48000000' | => setenv sd_boot2 'setenv bootargs 'root=/dev/mmcblk1p2 rootwait' ; booti 0x48080000 - 0x48000000' | ||
=> setenv bootcmd 'run sd_boot1 sd_boot2' | => setenv bootcmd 'run sd_boot1 sd_boot2' | ||
| Line 191: | Line 256: | ||
Reset the board and it will automatically boot | Reset the board and it will automatically boot | ||
''' | ==Linux Login== | ||
* | *The login will be '''root''' (no password is needed) | ||
*You can plug in a '''USB Mouse''' or '''USB Touchscreen''' | |||
=Board Version Identification= | |||
'''This section is only for RZ/G2L boards. (not RZ/G2LC or RZ/G2UL)''' | |||
There are currently multiple versions of RZ/G2L boards with different components. (There is only 1 version of RZ/G2LC board). Please make note of what board you have. <br> | |||
Some boards require different '''software patches''' to be applied before building. | |||
[[File:RZG2L_Discrete_vs_PMIC.png|thumb|right]] | |||
'''RZ/G2L Silicon version WS1 vs WS2:''' | |||
*The '''WS1''' Silicon version has the specific date code "2050KC002" written on top of the device | |||
*The '''WS2''' Silicon version has the text "RZ/G2L" written on top of the device | |||
= Board Setup Information = | '''Discrete Power Design vs New Renesas PMIC Solution:''' | ||
*The '''Discrete Power''' design has the words "Renesas" written in white silk screen on the '''top edge''' of the board. | |||
*The '''PMIC Power''' design has the words "Renesas" written in white silk screen in the '''center''' the board. Also, the PMIC has the words Renesas on the top of the device. | |||
'''Board Combinations:''' | |||
Here are the only release of these boards: | |||
*1st Release: WS1 Silicon + Discrete Power | |||
*2nd Release: WS2 Silicon + Discrete Power | |||
*3rd Release: WS2 Silicon + PMIC Power | |||
'''Power Button on PMIC Boards:''' | |||
*On the PMIC boards, please '''press and hold''' the <span style="color:red">red</span> power button for 2 seconds to turn ON and OFF. | |||
*If the "Carrier PWR On" LED does not turn green, please try again and hold the button longer. | |||
=Sample and Demo Code= | |||
'''General Sample Code''' | |||
* https://github.com/renesas-rz/rzg2l_smarc_sample_code | |||
** GPIO examples | |||
** Camera examples | |||
'''Camera Image Overlay Demos''' | |||
* https://github.com/renesas-rz/demo-camera-image-overlay | |||
* Capture camera images to memory, then use Hardware (OpenGL) to overlay images/text and then do h.264 encoding | |||
'''Camera Data Receive Unit (CRU) Sample Application''' | |||
* https://github.com/renesas-rz/rz_cru_sample_code | |||
* This sample application demonstrates using CRU functions for various image processing tasks like demosaicing raw camera data, color correction, and some simple camera functions. | |||
''' GStreamer Application Note ''' | |||
* [https://www.renesas.com/us/en/document/mas/rzg2l-group-and-rzv2l-group-linux-interface-specification-gstreamer-users-manual-software?utm_nooverride=1&language=en RZ/G2L Group and RZ/V2L Group Linux Interface Specification GStreamer User's Manual] | |||
* This User's Manual (Application Note) explains GStreamer and the custom plug-ins created by Renesas. | |||
* Usage examples are also included. | |||
=Board Setup Information= | |||
{| class="toccolours" width="100%" style="border-style: none ; text-align: center; background-color:white;" | {| class="toccolours" width="100%" style="border-style: none ; text-align: center; background-color:white;" | ||
|- | |- | ||
| [[File:board_configuration.png|frameless]]<br>'''RZ/G2L Evaluation Board Kit Configuration''' | |[[File:board_configuration.png|frameless]]<br>'''RZ/G2L Evaluation Board Kit Configuration''' | ||
| [[File:smarc_module_board_top.png|frameless|]] <br>'''RZ/G2L SMARC Module Board (TOP)''' | |[[File:smarc_module_board_top.png|frameless|]] <br>'''RZ/G2L SMARC Module Board (TOP)''' | ||
| [[File:smarc_module_board_bottom.png|frameless|]]<br>'''RZ/G2L SMARC Module Board (Bottom)''' | |[[File:smarc_module_board_bottom.png|frameless|]]<br>'''RZ/G2L SMARC Module Board (Bottom)''' | ||
| [[File:smarc_series_carrier_board.png|frameless|]]<br>'''RZ SMARC Series Carrier Board''' | | | ||
[[File:smarc_series_carrier_board.png|frameless|]]<br>'''RZ SMARC Series Carrier Board''' | |||
|- | |- | ||
| | | | ||
|- | |- | ||
| colspan="2" style="text-align:left;" | [[File:power_supply.png|frameless|]]<br>'''Power Supply'''<br>The following power supply environment is used in the evaluation of Renesas:<br>● USB Type-C cable CB-CD23BK (manufactured by Aukey) <br> ● USB PD Charger Anker PowerPort III 65W Pod (manufactured by Anker) | | colspan="2" style="text-align:left;" |[[File:power_supply.png|frameless|]]<br>'''Power Supply'''<br>The following power supply environment is used in the evaluation of Renesas:<br>● USB Type-C cable CB-CD23BK (manufactured by Aukey) <br> ● USB PD Charger Anker PowerPort III 65W Pod (manufactured by Anker) | ||
| colspan="2" style="text-align:left;" |[[File:JTAG_connection_ice_debug.png|frameless|]]<br>'''JTAG Cable Connection for ICE Debugging'''<br>When connecting JTAG debugger, please set the DIP SW1 settings as shown.<br>The JTAG connector is 10pin. | | colspan="2" style="text-align:left;" |[[File:JTAG_connection_ice_debug.png|frameless|]]<br>'''JTAG Cable Connection for ICE Debugging'''<br>When connecting JTAG debugger, please set the DIP SW1 settings as shown.<br>The JTAG connector is 10pin. | ||
|- | |- | ||
|- | |- | ||
| | | | ||
|- | |- | ||
| [[File:boot_mode.png|frameless|]]<br>'''How to set Boot Modes''' | |[[File:boot_mode.png|frameless|]]<br>'''How to set Boot Modes''' | ||
|- | |- | ||
| | | | ||
|- | |- | ||
| colspan="2" style="text-align:left;" | [[File:RZG2UL_SW1_setting.png|frameless|]]<br>'''Smarc RZ/G2UL DIP Switch(SW1) Settings''' | | colspan="2" style="text-align:left;" |[[File:RZG2UL_SW1_setting.png|frameless|]]<br>'''Smarc RZ/G2UL DIP Switch(SW1) Settings''' | ||
| colspan="2" style="text-align:left;" |[[File:RZG2LC_SW1_setting.png|frameless|]]<br>'''Smarc RZ/G2LC DIP Switch(SW1) Settings''' | | colspan="2" style="text-align:left;" |[[File:RZG2LC_SW1_setting.png|frameless|]]<br>'''Smarc RZ/G2LC DIP Switch(SW1) Settings''' | ||
|} | |} | ||
= Board Operation Information = | =Board Operation Information= | ||
{| class="toccolours" width="100%" style="border-style: none ; text-align: center; background-color:white;" | {| class="toccolours" width="100%" style="border-style: none ; text-align: center; background-color:white;" | ||
|- | |- | ||
| style="text-align:left;" | [[File:power_on.png|frameless|]]<br>'''Power ON'''<br>● Connect USB-PD Power Charger to USB Type-C Connector. Then LED1(VBUS PWR On) and LED3(Module PWR On) lights up.<br>● Press SW9 to turn on the power. Then LED4(Carrier PWR On) lights up. | | style="text-align:left;" | [[File:power_on.png|frameless|]]<br>'''Power ON'''<br>● Connect USB-PD Power Charger to USB Type-C Connector. Then LED1(VBUS PWR On) and LED3(Module PWR On) lights up.<br>● Press SW9 to turn on the power. Then LED4(Carrier PWR On) lights up. | ||
| style="text-align:left;" | [[File:debug_serial.png|frameless|]]<br>'''Debug Serial (Console Output)'''<br>● Debug serial uses CN14. The baud rate is 115200bps.<br>● Since the serial-USB conversion IC is not always powered, the Windows PC will recognize it after the power switch is turned on.<br>● If it is not recognized by your Windows PC, please install the driver�https://www.ftdichip.com/Drivers/VCP.htm | | style="text-align:left;" |[[File:debug_serial.png|frameless|]]<br>'''Debug Serial (Console Output)'''<br>● Debug serial uses CN14. The baud rate is 115200bps.<br>● Since the serial-USB conversion IC is not always powered, the Windows PC will recognize it after the power switch is turned on.<br>● If it is not recognized by your Windows PC, please install the driver�https://www.ftdichip.com/Drivers/VCP.htm | ||
|} | |} | ||
= LCD Monitors = | =LCD Monitors= | ||
The following HDMI LCD screens were tested with this board. | The following HDMI LCD screens were tested with this board. | ||
{| class="wikitable" | {| class="wikitable" | ||
|+ LCD Monitors | |+LCD Monitors | ||
|- | |- | ||
! | ! | ||
! Resolution | !Resolution | ||
! Touchscreen | !Touchscreen | ||
! style="width: 150px" | Description | ! style="width: 150px" | Description | ||
! style="width: 60px" | Link | ! style="width: 60px" | Link | ||
! Comments | !Comments | ||
|- | |- | ||
| style="background-color: #E0FFE0;" | 🙂 || 1920x1080 || Yes || Wimaxit 14 Inch || [https://www.amazon.com/WIMAXIT-Portable-Monitor-Computer-External/dp/B08JLWNX22 🛒 buy] || This is a very nice screen. Good color and easy to press the icons. The LCD input is mini-HDMI and comes with a mini-HDMI to HDMI cable. The RZ board is micro-HDMI. You will also need to buy a [https://www.amazon.com/UGREEN-Adapter-Supports-Compatible-Raspberry/dp/B08P5SDCVT HDMI to micro-HDMI adapter]. Or, buy a [https://www.amazon.com/BronaGrand-Micro-Connector-Adapter-Cable/dp/B08BC3N93R mini-HDMI to HDMI-micro cable]. Note the the micro-USB connection on the LCD for touchscreen does not work, but the USB-C connector does work for touchscreen. You will simply need a [https://www.amazon.com/Anker-2-Pack-Premium-Charging-Samsung/dp/B07DD5YHMH USB-C to USB-A cable] or [https://www.amazon.com/Female-Adapter-Charger-Airpods-Samsung/dp/B079LYHNSR adapter]. | | style="background-color: #E0FFE0;" | 🙂||1920x1080||Yes||Wimaxit 14 Inch||[https://www.amazon.com/WIMAXIT-Portable-Monitor-Computer-External/dp/B08JLWNX22 🛒 buy]||This is a very nice screen. Good color and easy to press the icons. The LCD input is mini-HDMI and comes with a mini-HDMI to HDMI cable. The RZ board is micro-HDMI. You will also need to buy a [https://www.amazon.com/UGREEN-Adapter-Supports-Compatible-Raspberry/dp/B08P5SDCVT HDMI to micro-HDMI adapter]. Or, buy a [https://www.amazon.com/BronaGrand-Micro-Connector-Adapter-Cable/dp/B08BC3N93R mini-HDMI to HDMI-micro cable]. Note the the micro-USB connection on the LCD for touchscreen does not work, but the USB-C connector does work for touchscreen. You will simply need a [https://www.amazon.com/Anker-2-Pack-Premium-Charging-Samsung/dp/B07DD5YHMH USB-C to USB-A cable] or [https://www.amazon.com/Female-Adapter-Charger-Airpods-Samsung/dp/B079LYHNSR adapter]. | ||
|- | |- | ||
| style="background-color: #E0FFE0;" | 🙂 || 1920x1080 || Yes || ELECROW 10.1 Inch || [https://www.amazon.com/ELECROW-Raspberry-1920X1080p-Touchscreen-Capacitive/dp/B082HWF2HW 🛒 buy] || This is a very nice screen. You will also need to buy a HDMI to micro-HDMI cable. | | style="background-color: #E0FFE0;" | 🙂||1920x1080||Yes||ELECROW 10.1 Inch||[https://www.amazon.com/ELECROW-Raspberry-1920X1080p-Touchscreen-Capacitive/dp/B082HWF2HW 🛒 buy]||This is a very nice screen. You will also need to buy a HDMI to micro-HDMI cable. | ||
|- | |- | ||
| style="background-color: #FFFFE0;" | 😐 || 1920x1080 || Yes/No(issues) || EVICIV 10.1 Inch || [https://www.amazon.com/dp/B095R6SXX1 🛒 buy] || ⚠️ The display works, USB touch is detected and shows up as /dev/input/event0, but does not work 100%. You can 'scroll' in a web page by dragging your finger on the screen, but actually touches (mouse clicks) do not work for some reason. There is also a noisy fan inside for an R-pi that you'll need to unplug. You will also need to buy a HDMI to micro-HDMI cable. I would not recommend his one. | | style="background-color: #FFFFE0;" | 😐||1920x1080||Yes/No(issues)||EVICIV 10.1 Inch||[https://www.amazon.com/dp/B095R6SXX1 🛒 buy]||⚠️ The display works, USB touch is detected and shows up as /dev/input/event0, but does not work 100%. You can 'scroll' in a web page by dragging your finger on the screen, but actually touches (mouse clicks) do not work for some reason. There is also a noisy fan inside for an R-pi that you'll need to unplug. You will also need to buy a HDMI to micro-HDMI cable. I would not recommend his one. | ||
|- | |- | ||
| style="background-color: #E0FFE0;" | 🙂 || 1280x800 || Yes || SunFounder 10.1 inch || [https://www.amazon.com/dp/B0776VNW9C 🛒 buy] || All the cables that you will need are included. | | style="background-color: #E0FFE0;" |🙂||1280x800||Yes||SunFounder 10.1 inch||[https://www.amazon.com/dp/B0776VNW9C 🛒 buy]||All the cables that you will need are included. | ||
|- | |- | ||
| style="background-color: #E0FFE0;" | 🙂 || 1024x600 || Yes || Ingcool 7 inch<br>7IP-CAPLCD || [https://www.amazon.com/Ingcool-Resolution-Capacitive-Compatible-Raspberry/dp/B08H8HZRLQ 🛒 buy] || If you attach the 'Touch' USB connection on the LCD to the RZ/G2L board, it will both power the LCD board as well as enable touch support. This kit comes with HDMI cables. | | style="background-color: #E0FFE0;" | 🙂||1024x600||Yes||Ingcool 7 inch<br>7IP-CAPLCD||[https://www.amazon.com/Ingcool-Resolution-Capacitive-Compatible-Raspberry/dp/B08H8HZRLQ 🛒 buy]||If you attach the 'Touch' USB connection on the LCD to the RZ/G2L board, it will both power the LCD board as well as enable touch support. This kit comes with HDMI cables. | ||
|- | |- | ||
| style="background-color: #E0FFE0;" | 🙂 || 800x480 || Yes || GeeekPi 5 Inch<br>EP-0081 || [https://www.amazon.com/gp/product/B0749D617J 🛒 buy] || HDMI cable not included. | | style="background-color: #E0FFE0;" |🙂||800x480||Yes||GeeekPi 5 Inch<br>EP-0081||[https://www.amazon.com/gp/product/B0749D617J 🛒 buy]||HDMI cable not included. | ||
|- | |- | ||
| style="background-color: #FFFFE0;" | 😐 || 800x480 || Yes/No(Header) || Kuman 5 Inch<br>SC5A-US-KFBA || [https://www.amazon.com/gp/product/B07QB2FGSL 🛒 buy] || ⚠️ The Touchscreen comes out on a header and no easy way to hook it up. HDMI cable not included. | | style="background-color: #FFFFE0;" | 😐||800x480||Yes/No(Header)||Kuman 5 Inch<br>SC5A-US-KFBA||[https://www.amazon.com/gp/product/B07QB2FGSL 🛒 buy]||⚠️ The Touchscreen comes out on a header and no easy way to hook it up. HDMI cable not included. | ||
|- | |- | ||
| style="background-color: #FFE0E0;" | ☹️ ||800x480 || Yes || ELECROW 5 inch || [https://www.amazon.com/Elecrow-Capacitive-interface-Supports-Raspberry/dp/B07FDYXPT7 🛒 buy] || ⚠️ This screen flickers with the RZ/G2L board. The reason is not known. | | style="background-color: #FFE0E0;" | ☹️||800x480||Yes||ELECROW 5 inch||[https://www.amazon.com/Elecrow-Capacitive-interface-Supports-Raspberry/dp/B07FDYXPT7 🛒 buy]||⚠️ This screen flickers with the RZ/G2L board. The reason is not known. | ||
|} | |} | ||
= Using the Coral MIPI Camera = | =Using the Coral MIPI Camera= | ||
GStreamer can be used to capture camera images from a Coral MIPI Camera. | |||
' | Below is a User's Manual (Application Note) explains GStreamer and the custom plug-ins created by Renesas. | ||
Usage examples are also included. | |||
* '''RZ/G2L Group and RZ/V2L Group Linux Interface Specification GStreamer User's Manual''' | |||
* https://www.renesas.com/us/en/document/mas/rzg2l-group-and-rzv2l-group-linux-interface-specification-gstreamer-users-manual-software?utm_nooverride=1&language=en | |||
<br> | |||
< | |||
Additional information on camera setup can be found on page [[RZ-G/RZG_camera]] | |||
=Building Qt Demos= | |||
Support for building Qt v5.6.3 is included in BSP v3.0.0 and later by build core-image-qt | |||
<pre> | <pre> | ||
bitbake core-image-qt | |||
</pre> | </pre> | ||
However, if you would like to build and install the Qt demos in the BSP, you must enable them in our local.conf file. | |||
*Edit file '''build/conf/local.conf''' | |||
*Edit file | |||
*Remove the comment marker # to set QT_DEMO = "1" | *Remove the comment marker # to set QT_DEMO = "1" | ||
<pre> | <pre> | ||
| Line 327: | Line 402: | ||
</pre> | </pre> | ||
Now you can build core-image-qt. | *Now you can build core-image-qt. | ||
<pre> | <pre> | ||
$ bitbake core-image-qt | $ bitbake core-image-qt | ||
</pre> | </pre> | ||
After the build is complete, copy the new root file system to your SD Card | *After the build is complete, copy/expand the new root file system to your SD Card | ||
<pre> | <pre> | ||
$ cd build/tmp/deploy/images/smarc-rzg2l | $ cd build/tmp/deploy/images/smarc-rzg2l | ||
| Line 340: | Line 415: | ||
After the board boots, on the Weston desktop you will see icons that will start the demos. | After the board boots, on the Weston desktop you will see icons that will start the demos. | ||
= | =Enable eMMC Boot= | ||
eMMC Boot refers to the SoC booting directly from eMMC flash after RESET. This means SPI Flash is not used. | |||
Note that eMMC Flash is always used to store the u-boot environment variables, even when boot from SPI Flash is enabled. SPI Flash is never used to store the u-boot environment variables as there is not code to support that. This means that when you switch between SPI Flash booting and eMMC Flash booting, your u-boot environment variables will remain the same. | |||
''' | But default, the boot loader (TrustedFirmware-A) contains '''both''' support to boot from both SPI or eMMC Flash. During boot, the code will read a boot register to determine if it should load from SPI Flash or eMMC Flash. This means you can use the same default Yocto output for either SPI Flash boot or eMMC boot. | ||
However, you will need to program the eMMC Flash boot partitions and configure the eMMC device with the proper boot configuration to match the RZ/G2L. | |||
The follow commands (copy/paste) and instructions will allow you to program the eMMC device on your board using the Flash Writer that was built in Yocto, and a helpful script (flash_writer_tool) that will automate the programming. | |||
The follow commands (copy/paste) and instructions will allow you to | |||
{| class="mw-collapsible mw-collapsed wikitable" | {| class="mw-collapsible mw-collapsed wikitable" | ||
| Line 456: | Line 431: | ||
| | | | ||
<pre> | <pre> | ||
#--------------------------------------------------- | #--------------------------------------------------- | ||
# Download and run 'Flash Writer Tool' | # Download and run 'Flash Writer Tool' | ||
| Line 552: | Line 441: | ||
./flash_writer_tool.sh | ./flash_writer_tool.sh | ||
### For 'Board', select | ### For 'Board', select the board you are using. | ||
### For 'Target Flash', select "eMMC Flash" | ### For 'Target Flash', select "eMMC Flash" | ||
### For 'FILES_DIR', manually set to | ### For 'FILES_DIR', manually set to the location of your Yocto output files (full path) | ||
### Do the follow operations: | ### Do the follow operations: | ||
Step 1. Select "Show Switches" to show how to put board into SCIF Download mode | Step 1. Select "Show Switches" to show how to put board into SCIF Download mode, then press the RESET button on the board. | ||
Step 2. Select "Download F.W." | Step 2. Select "Download F.W." | ||
Step 3. Select "eMMC boot setup" | Step 3. Select "eMMC boot setup" | ||
| Line 570: | Line 459: | ||
|} | |} | ||
=Program On-Board eMMC Flash = | =Program On-Board eMMC Flash= | ||
*To program the eMMC Flash device on the SOM board, you can follow the instructions below. | *To program the eMMC Flash device on the SOM board, you can follow the instructions below. | ||
| Line 636: | Line 525: | ||
</pre> | </pre> | ||
= | =SD card boot= | ||
To | '''''<big>Note: SD card boot is supported out of the box since VLP3.0.2 (and corresponding Arm Trusted Firmware version), the files to be programmed are available in the Yocto image folder. You can jump to [[RZ-G/RZ-G2L SMARC#SD Card Preparation|this section]] if you already have the files.</big>''''' | ||
RZ/G2L-LC-UL and RZ/V2L can also boot from a (micro) SD card, this is boot mode 0 called "Booting from eSD" in the User Manual. | |||
This procedure is similar to what reported above for [[RZ-G/RZ-G2L SMARC#Enable eMMC Boot|eMMC boot]], we are not using Yocto to build (not supported in VLP3.0.0). | |||
Assuming that the host PC is already configured to cross-build: | |||
mkdir sd_boot | |||
cd sd_boot | |||
Now let's clone and patch RZ/G Trusted Firmware: | |||
git clone <nowiki>https://github.com/renesas-rz/rzg_trusted-firmware-a</nowiki> | |||
cd rzg_trusted-firmware-a | |||
git checkout v2.6/rz | |||
wget <nowiki>https://raw.githubusercontent.com/seebe/rzg_stuff/master/tfa_patches/0001-SD-boot-support.patch</nowiki> | |||
patch -p1 < 0001-SD-boot-support.patch | |||
cd .. | |||
Clone u-boot: | |||
git clone <nowiki>https://github.com/renesas-rz/renesas-u-boot-cip</nowiki> | |||
cd renesas-u-boot-cip/ | |||
git checkout v2021.10/rz | |||
cd .. | |||
Retrieve some useful scripts to ease the TF-A and u-boot builds, as well as the generation of the binary files we need: | |||
wget <nowiki>https://raw.githubusercontent.com/renesas-rz/rzg2_bsp_scripts/master/build_scripts/build_common.sh</nowiki> | |||
wget <nowiki>https://raw.githubusercontent.com/renesas-rz/rzg2_bsp_scripts/master/build_scripts/build_tfa.sh</nowiki> | |||
wget <nowiki>https://raw.githubusercontent.com/renesas-rz/rzg2_bsp_scripts/master/build_scripts/build_uboot.sh</nowiki> | |||
wget <nowiki>https://raw.githubusercontent.com/renesas-rz/rzg2_bsp_scripts/master/build_scripts/build.sh</nowiki> | |||
wget <nowiki>https://raw.githubusercontent.com/renesas-rz/rzg2_bsp_scripts/master/usb_sd_partition/usb_sd_partition.sh</nowiki> | |||
chmod +x *.sh | |||
Select toolchain that you have: | |||
./build.sh s | |||
Let's build u-boot: | |||
./build.sh u | |||
Then TF-A, normally you can leave the default parameters (smarc rz/g2l is the default board) and boot device does not matter: | |||
./build.sh t | |||
==SD Card Preparation== | |||
Now we have to prepare the (micro) SD card. We can optionally zero it out ('''<u>WARNING: THE SD CARD CONTENT WILL BE DESTROYED</u>'''): | |||
sudo dd if=/dev/zero of=/dev/sda bs=1M status=progress | |||
Then, assuming you want to use the same SD card to store kernel and device tree, we can (optionally) partition it: | |||
./usb_sd_partition.sh | |||
We are ready to write the boot files to some specific sectors of the SD card (MBR and partitions won't be touched): | |||
cd output_smarc-rzg2l/ | |||
sudo dd if=bootparams-smarc-rzg2l.bin of=/dev/sda seek=1 count=1 | |||
sudo dd if=bl2-smarc-rzg2l.bin of=/dev/sda seek=8 | |||
sudo dd if=fip-smarc-rzg2l.bin of=/dev/sda seek=128 | |||
sync | |||
[[File:SD card.png|frameless|1160x1160px]] | |||
''(*) Note: the size of the files and SD card reported in this picture are just examples. Actual output files size may be different and there is no limitation on the SD card capacity.'' | |||
==Board Preparation== | |||
If you are using the SMARC board you can insert the micro SD card in the SOM module slot: | |||
[[File:smarc micro sd.png|frameless|328x328px]] | |||
Change the switches to eSD boot on the carrier board acting on SW11 (SW11-1 ON, SW11-2 ON, SW11-3 OFF, SW11-4 ON): | |||
[[File:SW11 - sd boot.png|frameless]] | |||
Change SW1 on the module to select micro sd card slot (SW1-1 ON, SW1-2 ON): | |||
[[File:SW1 - sd boot.png|frameless]] | |||
and finally the board is ready to boot from the micro SD card: | |||
NOTICE: BL2: v2.6(release):7e8696ff4-dirty | |||
NOTICE: BL2: Built : 12:07:55, Sep 8 2022 | |||
NOTICE: BL2: SD boot from partition 0 | |||
NOTICE: BL2: Load dst=0x1f7c0 src=(p:0)0x10000(128) len=0x10(1) | |||
NOTICE: BL2: SD boot from partition 0 | |||
NOTICE: BL2: Load dst=0x1f920 src=(p:0)0x10010(128) len=0x28(1) | |||
NOTICE: BL2: SD boot from partition 0 | |||
NOTICE: BL2: Load dst=0x44000000 src=(p:0)0x10090(128) len=0x6069(49) | |||
NOTICE: BL2: SD boot from partition 0 | |||
NOTICE: BL2: Load dst=0x1f7c0 src=(p:0)0x10000(128) len=0x10(1) | |||
NOTICE: BL2: SD boot from partition 0 | |||
NOTICE: BL2: Load dst=0x1f920 src=(p:0)0x10010(128) len=0x28(1) | |||
NOTICE: BL2: Load dst=0x1f920 src=(p:0)0x10038(128) len=0x28(1) | |||
NOTICE: BL2: SD boot from partition 0 | |||
NOTICE: BL2: Load dst=0x50000000 src=(p:0)0x16100(176) len=0xa9878(1357) | |||
NOTICE: BL2: Booting BL31 | |||
NOTICE: BL31: v2.6(release):7e8696ff4-dirty | |||
NOTICE: BL31: Built : 12:07:55, Sep 8 2022 | |||
U-Boot 2021.10-g90edad6e00 (Sep 08 2022 - 11:55:48 +0200) | |||
CPU: Renesas Electronics K rev 6.15 | |||
Model: smarc-rzg2l | |||
DRAM: 1.9 GiB | |||
MMC: sd@11c00000: 0, sd@11c10000: 1 | |||
Loading Environment from MMC... MMC partition switch failed | |||
*** Warning - MMC partition switch failed, using default environment | |||
In: serial@1004b800 | |||
Out: serial@1004b800 | |||
Err: serial@1004b800 | |||
Net: | |||
Error: ethernet@11c20000 address not set. | |||
No ethernet found. | |||
Please note that u-boot by default is configured to store the environment variables on the eMMC boot partition 2. On the Smarc EVKs the SD card slot is shared with eMMC, so environment variables cannot be loaded / saved. | |||
==Use SD card for u-boot environment variables== | |||
Please note that u-boot by default is configured to store the environment variables on the eMMC boot partition 2. | |||
It is possible to configure u-boot to use the SD card also as env variable storage device. We can take advantage of the spare space between the end of FIP and first partition: | |||
[[File:sd boot env variables.png|frameless|400x400px]] | |||
To do that it is sufficient to modify the u-boot configuration: | |||
./build.sh u menuconfig | |||
Navigate to "Environment --->" and change: | |||
'''mmc partition number -> 0''': there is only one physical partition on a sd card, so select it. | |||
'''Environment size -> 0x10000''': use 64K space for u-boot environment variables, i.e 128 sectors (512 bytes) | |||
'''Environment offset -> 0xF0000''': this is the offset starting from the base. We want to start from 2048 (first logical partition) - 128 (size) = 1920. 1920 * 512 = 983.040 = 0xF0000 | |||
[[File:sd boot env variables menuconfig.png|frameless|800x800px]] | |||
Exit and save. | |||
==Change Bus Width== | |||
You also need to configure bus width to 4, instead of 8. This can be done by modifying the device tree (arch/arm/dts/smarc-rzg2l.dts): | |||
&sdhi0 { | |||
/* pinctrl placeholder | |||
* If this channel is used for interfacing with a SD card, a power enable | |||
* pin (SD0_PWR_EN) must be defined. | |||
* The SD0_PWR_EN pin is associated with P4_1. | |||
* A HIGH signal on SD0_PWR_EN will enable supply voltage for SD card. | |||
*/ | |||
bus-width = <4>; | |||
status = "okay"; | |||
}; | |||
Exit and save, then rebuild both u-boot and TF-A and reprogram bl2 and fip binaries as documented in the previous section. | |||
You can also program your own environment variables, creating a binary as described in [[RZ-G/RZ-G2L Flash Programming#Generating u-boot variables binary|this section]] and then program it: | |||
sudo dd if=u-boot-env.bin of=/dev/sda seek=1920 | |||
=RZG2L Cortex-M33 Multi-OS Package= | |||
Instructions for RZV Cortex-M33 Multi-OS Package is located below. | |||
'''[[Cortex-M33 Multi-OS Package Support]]''' | |||
=US108 2D Barcode Scanner Carrier Board= | |||
*2D Barcode Scanner Demo | |||
*'''[[RZ-G/US108 | Please Click Here...]]''' | |||
=Importing Orcad design files into Altium= | |||
SMARC board schematics and layout are provided in Orcad format only, .dns and .brd respectively. These files can be imported into Altium designer using [https://www.altium.com/documentation/altium-designer/orcad-import this guide] and/or [https://www.altium.com/documentation/knowledge-base/altium-designer/how-to-import-allegro-binary-file-brd-to-altium this guide]. | |||
=RZ/G2UL Type2 VLP= | |||
A RZ/G2UL Type2 EVK is not available for purchase. | |||
For evaluation, it's recommended to use the RZ/G2UL Type1 or the RZ/G2LC EVK. | |||
RZ/G2UL VLP releases are prepared for the RZ/G2UL Type1 EVK. | |||
In case the RZ/G2LC EVK is equipped with RZ/G2UL Type2, the following VLP v3.0.1 patch is suitable to build the device tree. | |||
[[File:0001-Added-VLP-v3.0.1-based-RZ-G2UL-Type2-Smarc-board-sup.patch]] | |||
= DirectFB for RZ/G2UL = | |||
<html><img width=150px align=right src="https://avatars.githubusercontent.com/u/80045286?v=4"></html> | |||
'''What is DirectFB?''' | |||
* Since the RZ/G2UL does not have a GPU, the Weston desktop cannot be used. Instead, graphical applications are required to use the traditional legacy Frame Buffer (/dev/fb0) Linux interface. | |||
* There is an old graphic framework call '''DirectFB''' that used to be very popular for the /dev/fb0 interface. You can read it about it here: https://elinux.org/DirectFB | |||
* The project is no longer active, however you can still enable and build the code in Yocto and it is still quite useful for validating LCDs | |||
<br> | |||
'''What is DirectFB2?''' | |||
* Someone has decided to keep the project going as "DirectFB2" ([https://www.cnx-software.com/2022/01/26/directfb2-project-brings-back-directfb-graphics-library-for-linux-embedded-systems/ Article]) | |||
* On github, you can find the code (https://github.com/directfb2) and documentations (https://github.com/directfb2/directfb2.github.io) | |||
<br> | |||
'''Instructions for adding the original DirectFB to Yocto:''' | |||
* DirectFB recipes are included in the standard '''meta-openembedded''' layer (meta-openembedded/meta-oe/recipes-graphics/directfb/) | |||
* The source files are downloaded from the Yocto Mirror server since the DirectFB website and repo have been gone for years. | |||
* The Yocto recipes will also apply various patches to fix bugs that were in the final v1.7.7 release of DirectFB. | |||
1. Edit your local.conf file and add these lines: | |||
<pre> | |||
DISTRO_FEATURES_append = " directfb" | |||
IMAGE_INSTALL_append = " directfb directfb-examples " | |||
</pre> | |||
2. Build (bitbake) a '''core-image-minimal''' or '''core-image-bsp'''. Then program your board with that new image. | |||
3. After booting your board, log in as root and create a file '''/home/root/<font color=blue>.directfbrc</font>''' . Add the below contents to the .directfbrc file. Of course, change the resolution of the mode to match your LCD. | |||
<pre> | |||
system=fbdev | |||
module-dir=/usr/lib64/directfb-1.7-7/ | |||
fbdev=/dev/fb0 | |||
mode=1280x720 | |||
depth=32 | |||
</pre> | |||
4. Log out, then log back in. | |||
5. Now you can run the directfb examples you build. For example: | |||
<pre> | <pre> | ||
$ df_andi | |||
</pre> | </pre> | ||
Generally, most of the examples start with "df_" . Here are some that are interesting. | |||
* df_dok | |||
** A benchmark demo that uses all the DirectFB APIs. People used to use this to compare CPU performance. | |||
* df_andi | |||
** Penguin walking demo | |||
* df_knuckles | |||
A 3D skull with rotate light. If you have a mouse, you can rotate the skull. | |||
* df_neo | |||
** Fly icons that change color and size | |||
* df_input | |||
** Used for checking the touchscreen or mouse inputs | |||
* df_windows | |||
** You can move windows around with touch screen or mouse | |||
<br> | |||
= Enable 2 Ethernet ports on EVK = | |||
* | * There are 2 Ethernet on EVK board. Add-on networking functions may require users to use both ethernet cables. For doing so, please | ||
1. Enable the ETHER0 port in the device tree. For example, enable Eth0 on RZ/Five: | |||
<pre> | <pre> | ||
# <kernel dir>/arch/riscv/boot/dts/renesas/r9a07g043f01-smarc.dts | |||
10 | |||
11 /* | |||
12 * DIP-Switch SW1 setting | |||
13 * 1 : High; 0: Low | |||
14 * SW1-2 : SW_SD0_DEV_SEL (1: eMMC; 0: uSD) | |||
15 * SW1-3 : SW_ET0_EN_N (0: ETHER0; 1: CAN0,CAN1,SSI1,RSPI1) | |||
16 * Please change below MACROs corespondingly to SW1 setting | |||
17 */ | |||
18 | |||
19 #define SW_SW0_DEV_SEL 1 | |||
20 #define SW_ET0_EN_N 0 | |||
21 //#define SW_ET0_EN_N 1 | |||
22 | |||
23 #include "rzfive-smarc.dtsi" | |||
24 | |||
25 / { | |||
</pre> | </pre> | ||
= | 2. For RZ/Five and RZ/G2UL, please turn switch SW1_3 OFF on the smarc module: | ||
* | |||
* | [[File:smarc_sw1_3_off.png|SW1_3 OFF]] | ||
= Playing and Recording Audio = | |||
* The RZ/G2L SMARC has a WM8978 audio codec. By default, some ASLA settings are not configured so playing and recording is not available. | |||
* For example, if you play audio, you will not hear anything because the volume is set to 0%. | |||
* Before you can play or record audio, please enter the commands below. | |||
<pre> | <pre> | ||
$ amixer cset name='Left Input Mixer L2 Switch' on | |||
$ amixer cset name='Right Input Mixer R2 Switch' on | |||
$ amixer cset name='Headphone Playback Volume' 100 | |||
$ amixer cset name='PCM Volume' 100% | |||
$ amixer cset name='Input PGA Volume' 25 | |||
</pre> | </pre> | ||
* | * Then, you can record audio by using the command below | ||
<pre> | <pre> | ||
$ | $ arecord -M -twav -fS16_LE -r8000 /tmp/sample.wav | ||
</pre> | </pre> | ||
= | = Note about playing 48KHz and 44.1KHz audio files = | ||
The | The RZ/G2L SMARC EVK is designed to handle both 48KHz and 44.1KHz audio files seamlessly. These two sampling frequencies require 12.288MHz and 11.2896MHz master clock respectively (256x the sample rate). On the SMARC EVK we have a versaclock3 that provides the different clocks. When it comes to audio this is the configuration:[[File:Smarc audio clock.png|frameless|707x707px]] | ||
The versaclock3 clock generator generates audio_clk1 (SE1 output), audio_clk2 (Diff2 output), required by the RZ/G2L SSI (I2S peripheral), and audio_mclk (SE2) that is fed into the WM8978 codec as master clock. However the versaclock3 can be reconfigured to switch the audio_mclk dynamically between 11.2896MHz and 12.288MHz. This is done seamlessly because audio_mclk [https://github.com/renesas-rz/rz_linux-cip/blob/4f3d2d21ad698667c9ea6331923612effab4e1c9/arch/arm64/boot/dts/renesas/rzg2l-smarc.dtsi#L37 is not a fixed clock], the ALSA framework "sends" the reconfiguration request to both the SSI driver and the versaclock3 driver. The first driver switches reference clock input from audio_clk1 and audio_clk2 and viceversa, the latter driver sets the best clock parent for audio_mclk, that is in fact done by switching from DIV4 to DIV5 via I2C. | |||
[[File:image timing commander.png|frameless|640x640px]] | |||
This is the screenshot of the versaclock3 Timing Commander utility, that shows the default configuration stored in the OTP. | |||
Latest revision as of 13:16, 5 February 2024
 ← RZ-G
📌This page is for the RZ/G2L, RZ/G2LC, and RZ/G2UL evaluation boards.
General Information
- RZ/G2L
- Official Renesas RZ/G2L Device Website (link)
- Official RZ/G2L Evaluation Board Kit Website (link)
- Easy Download Guide for RZ/G2L and RZ/G2LC (link) - A single PDF file that lists all the available downloads on renesas.com.
- RZ/G2L Evaluation Kit Ordering Part Number: RTK9744L23S01000BE
- RZ/G2LC
- Official Renesas RZ/G2LC Device Website (link)
- Official RZ/G2LC Evaluation Board Kit Website
- Easy Download Guide for RZ/G2L and RZ/G2LC (link) - A single PDF file that lists all the available downloads on renesas.com.
- RZ/G2LC Evaluation Kit Ordering Part Number: RTK9744C22S01000BE
- RZ/G2UL
- Official Renesas RZ/G2UL Device Website (link)
- Official RZ/G2UL Evaluation Board Kit Website (link)
- Easy Download Guide for RZ/G2UL (link) - A single PDF file that lists all the available downloads on renesas.com.
- RZ/G2UL Evaluation Kit Ordering Part Number: RTK9744U11S01000BE
- There are 2 RZ/G2UL derivates:
- Type1:
- pin compatible with RZ/A3UL and RZ/Five.
- given on the RZ/G2UL EVK.
- part numbers:
- R9A07G043U11GBG (without security)
- R9A07G043U15GBG (with security)
- Type2:
- pin compatible with RZ/G2LC
- A RZ/G2UL Type2 EVK is not available for purchase. For evaluation, it's recommended to use the RZ/G2UL Type1 or the RZ/G2LC EVK.
- RZ/G2UL VLP releases are prepared for the RZ/G2UL Type1 EVK. RZ/G2UL Type2 specific modifications are mentioned here: RZ/G2UL Type2 VLP (link)
- part numbers:
- R9A07G043U12GBG (without security)
- R9A07G043U16GBG (with security)
- Type1:
- Articles
Getting Started
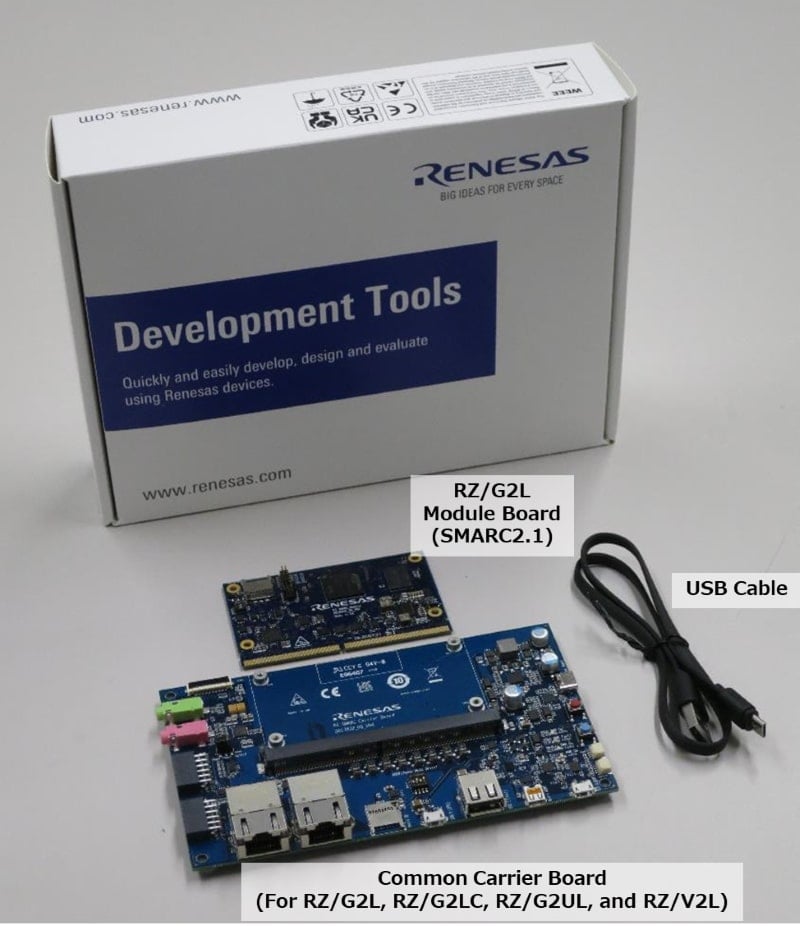
📄 Board User Manual
- The User Manual for the boards can be found their website pages on renesas.com.
- Check the 'General Information' section on this page for the links.
📦 What is included in the kit
- A Micro USB cable for serial console.
🛒 What you will need to purchase
- Power: (Required) USB Type-C power supply. 5V or 9V can be used. To use 9V, switch SW11-4 change is needed (please see the board manual).
- HDMI LCD: An LCD monitor with an HMDI input. Here is a list of tested touchscreen monitors: RZ-G/RZ-G2L_SMARC#LCD_Monitors
- mini-HDMI Adapter: The connector on the board is type mini-HDMI.
- USB Camera: A camera supporting USB Video Class (UVC) such as Logitec C270, C920, C922, BRIO Ultra HD Pro.
- USB Mouse: In the case that you do not have a touchscreen LCD monitor.
⭐ Pre-Built Binaries ⭐
- If you prefer to program pre-built binaries into your board, you can download them from renesas.com
- The package includes a complete SD Card image that can be written using Windows or Linux.
- Boot loaders are also included in the package.
- On the RZ/G Verified Linux Package [5.10-CIP ] BSP download page, look for "Pre-built Images" downloads for RZ/G2L, RZ/G2LC, RZ/G2UL.
- ⚠️ The instructions in the package for v3.0.5 are wrong and incomplete. Please use these instead.
For a Windows PC:
1. Use 7-Zip to extract/convert the .wic file ( core-image-qt-smarc-rzg2l.wic.gz → core-image-qt-smarc-rzg2l.wic )
2. Use Balena Etcher to program the .wic file into and SD Card. The card needs to be 4GB or larger.
3. Insert the SD card into the socket on Carrier Board.
┌─────┬─────┬─────┐
│     │ SOM │     │
│     └─────┘     │
│  Carrier Board  │
│     ┌─┐         │
└─────┴─┴─────────┘
       ↑
 SD Card Socket
4. Power the board and connect a terminal program (like Tera Term) to the USB-Serial connect. The Baud is 115,200. Stop the autoboot by pressing the space board on your keyboard before the count down stops. Note, even if you don't press the space, you will be OK because the auto-boot will fail and will leave you at the u-boot prompt " => "
5. Copy/paste these commands below (without the " => ") to create and save a new boot command.
=> setenv sd_boot1 'mmc dev 1 ; ext4load mmc 1:2 0x48080000 /boot/Image ; ext4load mmc 1:2 0x48000000 /boot/r9a07g044l2-smarc.dtb'

=> setenv sd_boot2 'setenv bootargs 'root=/dev/mmcblk1p2 rootwait' ; booti 0x48080000 - 0x48000000'

=> setenv bootcmd 'run sd_boot1 sd_boot2'

=> saveenv
6. Reset your board with the blue button, and it should now count down and then automatically boot into Linux. The Linux username will be "root", no password is needed.
💻 Build Environment
- To build the BSP, you will need a Linux PC running Ubuntu 20.04. This was the only host OS that was tested and that specific version is a requirement of Yocto 3.1 (dunfell). Using Ubuntu 22.04 will not work
- You can use a Linux PC (recommended) or a Virtual Machine. If using a Virtual Machine, 200GB of hard drive space is recommended for the minimum build.
- If you are not currently running Ubuntu 20.04, you can use a docker container.
- Example: Host Machine = Ubuntu 22.04 + Docker Container running Ubuntu 20.04 inside of it
- Some docker setup instructions and scripts are provided to make it easy to get started.
💾 Downloading the Linux BSP
- Download the RZ/G2L Board Support Package from renesas.com. Links to all the downloads can be found on the 📦 RZ/G2 Linux BSP on this site. Please refer to the sections that support RZ/G2L.
- The Linux-5.10 BSP is recommended.
- You will need to downloaded multiple packages for the full build. You will need to download the "RZ/G2L Mali Graphic Library" package to enable graphics and "RZ/G2L Codec Library" package to enable video encode/decode.
🔨 Building the BSP
- Build Instructions: The instructions for building the BSP are located in the Release Note document that is included in the ZIP file download from renesas.com.
- Board Versions: There are currently 3 versions of RZ/G2L boards (WS1-Discrete, WS2-Discrete, WS2-PMIC). Please review section Board Version Identification above. There is only 1 version of RZ/G2LC board. There is only 1 version of RZ/G2UL board. If you have a RZ/G2L 'WS1' board (very rare), please review section 6 in the 'Release Note' of the BSP in detail before following the instructions in section 3.
- Graphics Libraries: If you are building core-image-weston or core-image-qt, you need to add Mali Graphics library mentioned in step 1. Note that RZ/GUL and RZ/Five do not have a GPU, so you cannot run Weston or Qt.
- Enable Qt Demos: To build the Qt demos (core-image-qt) you must edit the file build/conf/local.conf and remove the comment marker # to set QT_DEMO = "1" . Please build (bitbake) core-image-weston first, then bitbake core-image-qt. If you buid core-image-qt first, you will get an error. Also, if you get a build error, just keep running the bitbake command again until it completes (there seems to be some issue in the order that packages build).
- Hint: To make the build faster, you can copy the downloads directory from an older BSP (rzg2l_bsp_vx.xx.0/build/downloads -> rzg2l_bsp_vx.xx.1/build/downloads) to skip downloading the same open source packages again.
⚡ Programing the Board
- The instructions for setting up and programming the board are located in the Board Start-up Guide that comes in the BSP download package
- A script for automating the programming the boot loaders into Flash can be found here: https://github.com/renesas-rz/rzg2_bsp_scripts/tree/master/flash_writer_tool
SD Card Loading and Booting
- These instructions are for using the output files from the Yocto build to prepare an SD Card and boot into Linux.
- The evaluation boards boot from SPI Flash (boot loaders), then can run Linux from either eMMC on the board or an external SD Card.
Format the SD Card
- The SD Card must be formatted by a Linux PC, and contain 2 partitions:
- Partition 1 = FAT16
- Partition 2 = ext4
- A helpful script has been created (usb_sd_partition) that you can run on your Linux PC.
- Insert your micro SD card into a USB-SD-Card reader and then plug into a Linux PC.
- Use the commands below to download the formatting script from github and run. Please select your card and choose the default settings.
$ wget https://raw.githubusercontent.com/renesas-rz/rzg2_bsp_scripts/master/usb_sd_partition/usb_sd_partition.sh
$ chmod +x usb_sd_partition.sh
$ ./usb_sd_partition.sh
Copy files to SD Card
- Use the commands below to copy the files you build with the BSP to the SD card. Start in the base of your Yocto BSP.
- Choose the correct command for RZ/G2L or RZ/G2LC or RZ/G2UL
# Change to the Yocto output directory that contains the files
$ cd build/tmp/deploy/images/smarc-rzg2l   # RZ/G2L
$ cd build/tmp/deploy/images/smarc-rzg2lc  # RZ/G2LC
$ cd build/tmp/deploy/images/smarc-rzg2ul  # RZ/G2UL

# Copy the Linux kernel to partition 1
$ sudo cp -v Image-smarc-rzg2l.bin  /media/$USER/RZ_FAT  # RZ/G2L
$ sudo cp -v Image-smarc-rzg2lc.bin /media/$USER/RZ_FAT  # RZ/G2LC
$ sudo cp -v Image-smarc-rzg2ul.bin /media/$USER/RZ_FAT  # RZ/G2UL

# Copy the Device Tree to partition 1
$ sudo cp -v Image-r9a07g044l2-smarc.dtb  /media/$USER/RZ_FAT   # RZ/G2L
$ sudo cp -v Image-r9a07g044c2-smarc.dtb  /media/$USER/RZ_FAT   # RZ/G2LC
$ sudo cp -v Image-r9a07g043u11-smarc.dtb /media/$USER/RZ_FAT   # RZ/G2UL

# Copy and expand the Root File System to partition 2
$ sudo tar -xvf core-image-minimal-smarc-rzg2l.tar.gz   -C /media/$USER/RZ_ext          # RZ/G2L
$ sudo tar -xvf core-image-minimal-smarc-rzg2lc.tar.gz  -C /media/$USER/RZ_ext          # RZ/G2LC
$ sudo tar -xvf core-image-minimal-smarc-rzg2ul.tar.gz  -C /media/$USER/RZ_ext          # RZ/G2UL
    (or if using graphics)
$ sudo tar -xvf core-image-weston-smarc-rzg2l.tar.gz   -C /media/$USER/RZ_ext           # RZ/G2L
$ sudo tar -xvf core-image-weston-smarc-rzg2lc.tar.gz   -C /media/$USER/RZ_ext          # RZ/G2LC
$ sudo tar -xvf core-image-bsp-smarc-rzg2ul.tar.gz   -C /media/$USER/RZ_ext             # RZ/G2UL

# Make sure all files are finished writing before removing the USB card reader from the PC
$ sync
- Safely remove your USB card reader by right clicking on the drive icon (either RZ_FAT or RZ_ext) in Ubuntu and selecting "Eject"
Switch settings for the CPU SOM board.
- The SOM board contains a eMMC Flash device and a Micro SD Card socket. On the SOM board, you can only use one or the other because they are both connected to the same peripheral channel on the RZ/G2L.
- ⚠️ u-boot environment variables are always stored in eMMC Flash (not SPI flash). This means if you change switch SW1-2 to ON on the SOM board, you cannot access saved u-boot environments variables and you will always get the message "*** Warning - MMC init failed, using default environment"
- Note that the SD Card slot on the Carrier board will always work regardless of the setting of SW1-2 because it uses a separate peripheral channel on the RZ/G2L.
- On the SOM (CPU) board, there is a little switch (SW1) near the SD card socket.
- Use the Recommended Settings below. It is the default of how the board was shipped.
[Recommended Settings]                        [Advanced Users Only]
 SOM board uses eMMC                           Flash SOM board uses SD Card socket
 SW1-1 = ON/OFF(JTAG)                          SW1-1 = ON/OFF(JTAG)
 SW1-2 = OFF                                   SW1-2 = ON
      +-----+                                       +-----+
      | ON  |                                       | ON  |
      | =   |                                       | = = |
      |   = |                                       |     |
      | 1 2 |                                       | 1 2 |
      +-----+                                       +-----+
Power the Board and Connect to the Serial Port
- On the Carrier Board, set switches SW11 as follows because the boot loaders are stored in QSPI Flash.
SW11-1 = OFF
SW11-2 = OFF
SW11-3 = OFF
SW11-4 = ON
      +---------+
      | ON      |
      |       = |
      | = = =   |
      | 1 2 3 4 |
      +---------+
- Supply power the board using the USB-C connection on the carrier board labeled "Power Input". You will only see 2 green LEDs lit.
- On the carrier board, press and hold the red power button for 2 seconds to turn ON (or OFF) power to the board. The green LED labeled "Carrier PWR On" will be lit when power is on (making a total of 3 green LEDs lit).
- Now that the board is powered and the onboard USB-to-Serial chip is also powered, plug a USB micro cable into the carrier board to the USB connector labeled "SER 3 UART". Use a serial terminal program to interact as you board. With a Linux PC, we recommend using "putty" (connects to /dev/USB0), and with a Windows PC we recommend "TeraTerm" that connects to COMx. The baud rate of the Serial connection is 115200 bps.
- Press the blue reset button, and then "u-boot" will start. Within 3 seconds, press the space bar on your keyboard in order to stop the auto-boot sequence.
Insert SD Card and Boot
- Insert the SD card into the socket on Carrier Board.
┌─────┬─────┬─────┐
│     │ SOM │     │
│     └─────┘     │
│  Carrier Board  │
│     ┌─┐         │
└─────┴─┴─────────┘
       ↑
 SD Card Socket
- Press the blue reset button, and then "u-boot" will start. Within 3 seconds, press the space bar on your keyboard in order to stop the auto-boot sequence.
- At the u-boot prompt ( => ), enter the following commands to boot the board.
- ⚠️ If you get an failure when saving with "saveenv", remove power to the board and try again.
RZ/G2L EVK Booting Commands:
   # Create command macros and save them:
=> setenv sd_boot1 'mmc dev 1 ; fatload mmc 1:1 0x48080000 Image-smarc-rzg2l.bin ; fatload mmc 1:1 0x48000000 /Image-r9a07g044l2-smarc.dtb'
=> setenv sd_boot2 'setenv bootargs 'root=/dev/mmcblk1p2 rootwait' ; booti 0x48080000 - 0x48000000'
=> setenv bootcmd 'run sd_boot1 sd_boot2'
=> saveenv
RZ/G2LC EVK Booting Commands:
   # Create command macros and save them:
=> setenv sd_boot1 'mmc dev 1 ; fatload mmc 1:1 0x48080000 Image-smarc-rzg2lc.bin ; fatload mmc 1:1 0x48000000 /Image-r9a07g044c2-smarc.dtb'
=> setenv sd_boot2 'setenv bootargs 'root=/dev/mmcblk1p2 rootwait' ; booti 0x48080000 - 0x48000000'
=> setenv bootcmd 'run sd_boot1 sd_boot2'
=> saveenv
RZ/G2UL EVK Booting Commands:
   # Create command macros and save them:
=> setenv sd_boot1 'mmc dev 1 ; fatload mmc 1:1 0x48080000 Image-smarc-rzg2ul.bin ; fatload mmc 1:1 0x48000000 /Image-r9a07g043u11-smarc.dtb'
=> setenv sd_boot2 'setenv bootargs 'root=/dev/mmcblk1p2 rootwait' ; booti 0x48080000 - 0x48000000'
=> setenv bootcmd 'run sd_boot1 sd_boot2'
=> saveenv
Reset the board and it will automatically boot
Linux Login
- The login will be root (no password is needed)
- You can plug in a USB Mouse or USB Touchscreen
Board Version Identification
This section is only for RZ/G2L boards. (not RZ/G2LC or RZ/G2UL)
There are currently multiple versions of RZ/G2L boards with different components. (There is only 1 version of RZ/G2LC board). Please make note of what board you have.
Some boards require different software patches to be applied before building.

RZ/G2L Silicon version WS1 vs WS2:
- The WS1 Silicon version has the specific date code "2050KC002" written on top of the device
- The WS2 Silicon version has the text "RZ/G2L" written on top of the device
Discrete Power Design vs New Renesas PMIC Solution:
- The Discrete Power design has the words "Renesas" written in white silk screen on the top edge of the board.
- The PMIC Power design has the words "Renesas" written in white silk screen in the center the board. Also, the PMIC has the words Renesas on the top of the device.
Board Combinations:
Here are the only release of these boards:
- 1st Release: WS1 Silicon + Discrete Power
- 2nd Release: WS2 Silicon + Discrete Power
- 3rd Release: WS2 Silicon + PMIC Power
Power Button on PMIC Boards:
- On the PMIC boards, please press and hold the red power button for 2 seconds to turn ON and OFF.
- If the "Carrier PWR On" LED does not turn green, please try again and hold the button longer.
Sample and Demo Code
General Sample Code
- https://github.com/renesas-rz/rzg2l_smarc_sample_code
- GPIO examples
- Camera examples
Camera Image Overlay Demos
- https://github.com/renesas-rz/demo-camera-image-overlay
- Capture camera images to memory, then use Hardware (OpenGL) to overlay images/text and then do h.264 encoding
Camera Data Receive Unit (CRU) Sample Application
- https://github.com/renesas-rz/rz_cru_sample_code
- This sample application demonstrates using CRU functions for various image processing tasks like demosaicing raw camera data, color correction, and some simple camera functions.
GStreamer Application Note
- RZ/G2L Group and RZ/V2L Group Linux Interface Specification GStreamer User's Manual
- This User's Manual (Application Note) explains GStreamer and the custom plug-ins created by Renesas.
- Usage examples are also included.
Board Setup Information
 RZ/G2L Evaluation Board Kit Configuration |
 RZ/G2L SMARC Module Board (TOP) |
 RZ/G2L SMARC Module Board (Bottom) |
|
 Power Supply The following power supply environment is used in the evaluation of Renesas: ● USB Type-C cable CB-CD23BK (manufactured by Aukey) ● USB PD Charger Anker PowerPort III 65W Pod (manufactured by Anker) |
 JTAG Cable Connection for ICE Debugging When connecting JTAG debugger, please set the DIP SW1 settings as shown. The JTAG connector is 10pin. | ||
 How to set Boot Modes | |||
 Smarc RZ/G2UL DIP Switch(SW1) Settings |
 Smarc RZ/G2LC DIP Switch(SW1) Settings | ||

Board Operation Information
 Power ON ● Connect USB-PD Power Charger to USB Type-C Connector. Then LED1(VBUS PWR On) and LED3(Module PWR On) lights up. ● Press SW9 to turn on the power. Then LED4(Carrier PWR On) lights up. |
 Debug Serial (Console Output) ● Debug serial uses CN14. The baud rate is 115200bps. ● Since the serial-USB conversion IC is not always powered, the Windows PC will recognize it after the power switch is turned on. ● If it is not recognized by your Windows PC, please install the driver�https://www.ftdichip.com/Drivers/VCP.htm |
LCD Monitors
The following HDMI LCD screens were tested with this board.
| Resolution | Touchscreen | Description | Link | Comments | |
|---|---|---|---|---|---|
| 🙂 | 1920x1080 | Yes | Wimaxit 14 Inch | 🛒 buy | This is a very nice screen. Good color and easy to press the icons. The LCD input is mini-HDMI and comes with a mini-HDMI to HDMI cable. The RZ board is micro-HDMI. You will also need to buy a HDMI to micro-HDMI adapter. Or, buy a mini-HDMI to HDMI-micro cable. Note the the micro-USB connection on the LCD for touchscreen does not work, but the USB-C connector does work for touchscreen. You will simply need a USB-C to USB-A cable or adapter. |
| 🙂 | 1920x1080 | Yes | ELECROW 10.1 Inch | 🛒 buy | This is a very nice screen. You will also need to buy a HDMI to micro-HDMI cable. |
| 😐 | 1920x1080 | Yes/No(issues) | EVICIV 10.1 Inch | 🛒 buy | ⚠️ The display works, USB touch is detected and shows up as /dev/input/event0, but does not work 100%. You can 'scroll' in a web page by dragging your finger on the screen, but actually touches (mouse clicks) do not work for some reason. There is also a noisy fan inside for an R-pi that you'll need to unplug. You will also need to buy a HDMI to micro-HDMI cable. I would not recommend his one. |
| 🙂 | 1280x800 | Yes | SunFounder 10.1 inch | 🛒 buy | All the cables that you will need are included. |
| 🙂 | 1024x600 | Yes | Ingcool 7 inch 7IP-CAPLCD |
🛒 buy | If you attach the 'Touch' USB connection on the LCD to the RZ/G2L board, it will both power the LCD board as well as enable touch support. This kit comes with HDMI cables. |
| 🙂 | 800x480 | Yes | GeeekPi 5 Inch EP-0081 |
🛒 buy | HDMI cable not included. |
| 😐 | 800x480 | Yes/No(Header) | Kuman 5 Inch SC5A-US-KFBA |
🛒 buy | ⚠️ The Touchscreen comes out on a header and no easy way to hook it up. HDMI cable not included. |
| ☹️ | 800x480 | Yes | ELECROW 5 inch | 🛒 buy | ⚠️ This screen flickers with the RZ/G2L board. The reason is not known. |
Using the Coral MIPI Camera
GStreamer can be used to capture camera images from a Coral MIPI Camera.
Below is a User's Manual (Application Note) explains GStreamer and the custom plug-ins created by Renesas.
Usage examples are also included.
- RZ/G2L Group and RZ/V2L Group Linux Interface Specification GStreamer User's Manual
- https://www.renesas.com/us/en/document/mas/rzg2l-group-and-rzv2l-group-linux-interface-specification-gstreamer-users-manual-software?utm_nooverride=1&language=en
Additional information on camera setup can be found on page RZ-G/RZG_camera
Building Qt Demos
Support for building Qt v5.6.3 is included in BSP v3.0.0 and later by build core-image-qt
bitbake core-image-qt
However, if you would like to build and install the Qt demos in the BSP, you must enable them in our local.conf file.
- Edit file build/conf/local.conf
- Remove the comment marker # to set QT_DEMO = "1"
# Adding qt demonstration to core-image-qt or not
QT_DEMO = "1"
- Now you can build core-image-qt.
$ bitbake core-image-qt
- After the build is complete, copy/expand the new root file system to your SD Card
$ cd build/tmp/deploy/images/smarc-rzg2l
$ sudo tar -xvf core-image-qt-smarc-rzg2l.tar.gz   -C /media/$USER/RZ_ext
$ cd -
$ sync
After the board boots, on the Weston desktop you will see icons that will start the demos.
Enable eMMC Boot
eMMC Boot refers to the SoC booting directly from eMMC flash after RESET. This means SPI Flash is not used.
Note that eMMC Flash is always used to store the u-boot environment variables, even when boot from SPI Flash is enabled. SPI Flash is never used to store the u-boot environment variables as there is not code to support that. This means that when you switch between SPI Flash booting and eMMC Flash booting, your u-boot environment variables will remain the same.
But default, the boot loader (TrustedFirmware-A) contains both support to boot from both SPI or eMMC Flash. During boot, the code will read a boot register to determine if it should load from SPI Flash or eMMC Flash. This means you can use the same default Yocto output for either SPI Flash boot or eMMC boot.
However, you will need to program the eMMC Flash boot partitions and configure the eMMC device with the proper boot configuration to match the RZ/G2L.
The follow commands (copy/paste) and instructions will allow you to program the eMMC device on your board using the Flash Writer that was built in Yocto, and a helpful script (flash_writer_tool) that will automate the programming.
| Instructions |
#--------------------------------------------------- # Download and run 'Flash Writer Tool' # - Configure for our output directory # - Configure for board "smarc-rzg2l" or for RZV2L "smarc-rzv2l" # - Configure for eMMC Flash boot #--------------------------------------------------- git clone https://github.com/renesas-rz/rzg2_bsp_scripts cd rzg2_bsp_scripts/flash_writer_tool ./flash_writer_tool.sh ### For 'Board', select the board you are using. ### For 'Target Flash', select "eMMC Flash" ### For 'FILES_DIR', manually set to the location of your Yocto output files (full path) ### Do the follow operations: Step 1. Select "Show Switches" to show how to put board into SCIF Download mode, then press the RESET button on the board. Step 2. Select "Download F.W." Step 3. Select "eMMC boot setup" Step 4. Select "Program BL2" Step 5. Select "Program FIP" Step 6. Select "Show Switches" to show how to put board into eMMC Boot mode Step 7. Select "<SAVE-and-EXIT>" |
Program On-Board eMMC Flash
- To program the eMMC Flash device on the SOM board, you can follow the instructions below.
- You will need to boot with SD card first and partition eMMC Flash device. Then you can load the files from SD card to eMMC Flash.
1. Copy listed files to “/home/root” of the SD Card that you use to boot the system.
RZG2L : core-image-weston-smarc-rzg2l.tar.gz, Image and r9a07g044l2-smarc.dtb
RZV2L : core-image-weston-smarc-rzv2l.tar.gz, Image and r9a07g054l2-smarc.dtb
2. Boot the board with the SD card and log into Linux.
3. Partition the eMMC Flash using fdisk.
- In fdisk, use the commands 'n' to make a new partition, and 'w' to write the partition (will automatically exit fdisk)
- In fdisk, you can just press the Enter Key to select the default value (you do not have to type the default value)
root@smarc-rzg2l:~# fdisk /dev/mmcblk0
Command (m for help): n
Partition number (1-128, default 1): 1                <<<< just press ENTER for default value
First sector (34-124321758, default 2048): 2048       <<<< just press ENTER for default value
Last sector, +/-sectors or +/-size{K,M,G,T,P} (2048-124321758, default 124321758): 124321758  <<<< just press ENTER for default value
Created a new partition 1 of type 'Linux filesystem' and of size 59.3 GiB.

Command (m for help): w
The partition table has been altered.
4. Format the partition as ext4
root@smarc-rzg2l:~# mkfs.ext4 -L rootfs /dev/mmcblk0p1
5. Mount the ext4 partition to "/mnt".
root@smarc-rzg2l:~# mount /dev/mmcblk0p1 /mnt
6. Extract the file system to the ext4 partition
RZG2L
root@smarc-rzg2l:~# cd /home/root
root@smarc-rzg2l:~# tar -zxvf core-image-weston-smarc-rzg2l.tar.gz -C /mnt
root@smarc-rzg2l:~# cp Image /mnt/boot
root@smarc-rzg2l:~# cp r9a07g044l2-smarc.dtb /mnt/boot
root@smarc-rzg2l:~# sync
RZV2L
root@smarc-rzg2l:~# cd /home/root
root@smarc-rzg2l:~# tar -zxvf core-image-weston-smarc-rzv2l.tar.gz -C /mnt
root@smarc-rzg2l:~# cp Image /mnt/boot
root@smarc-rzg2l:~# cp r9a07g054l2-smarc.dtb /mnt/boot
root@smarc-rzg2l:~# sync
7. Unmount “/mnt”
root@smarc-rzg2l:~# umount /mnt
8. Reboot and change the boot parameter in u-boot to boot from eMMC
=> setenv bootargs 'rw rootwait earlycon root=/dev/mmcblk0p1'
=> setenv bootcmd 'ext4load mmc 0:1 0x48080000 boot/Image; ext4load mmc 0:1 0x48000000 boot/r9a07g044l2-smarc.dtb; booti 0x48080000 - 0x48000000'
=> saveenv
=> boot
SD card boot
Note: SD card boot is supported out of the box since VLP3.0.2 (and corresponding Arm Trusted Firmware version), the files to be programmed are available in the Yocto image folder. You can jump to this section if you already have the files.
RZ/G2L-LC-UL and RZ/V2L can also boot from a (micro) SD card, this is boot mode 0 called "Booting from eSD" in the User Manual.
This procedure is similar to what reported above for eMMC boot, we are not using Yocto to build (not supported in VLP3.0.0).
Assuming that the host PC is already configured to cross-build:
mkdir sd_boot
cd sd_boot
Now let's clone and patch RZ/G Trusted Firmware:
git clone https://github.com/renesas-rz/rzg_trusted-firmware-a
cd rzg_trusted-firmware-a
git checkout v2.6/rz
wget https://raw.githubusercontent.com/seebe/rzg_stuff/master/tfa_patches/0001-SD-boot-support.patch
patch -p1 < 0001-SD-boot-support.patch
cd ..
Clone u-boot:
git clone https://github.com/renesas-rz/renesas-u-boot-cip
cd renesas-u-boot-cip/
git checkout v2021.10/rz
cd ..
Retrieve some useful scripts to ease the TF-A and u-boot builds, as well as the generation of the binary files we need:
wget https://raw.githubusercontent.com/renesas-rz/rzg2_bsp_scripts/master/build_scripts/build_common.sh
wget https://raw.githubusercontent.com/renesas-rz/rzg2_bsp_scripts/master/build_scripts/build_tfa.sh
wget https://raw.githubusercontent.com/renesas-rz/rzg2_bsp_scripts/master/build_scripts/build_uboot.sh
wget https://raw.githubusercontent.com/renesas-rz/rzg2_bsp_scripts/master/build_scripts/build.sh
wget https://raw.githubusercontent.com/renesas-rz/rzg2_bsp_scripts/master/usb_sd_partition/usb_sd_partition.sh
chmod +x *.sh
Select toolchain that you have:
./build.sh s
Let's build u-boot:
./build.sh u
Then TF-A, normally you can leave the default parameters (smarc rz/g2l is the default board) and boot device does not matter:
./build.sh t
SD Card Preparation
Now we have to prepare the (micro) SD card. We can optionally zero it out (WARNING: THE SD CARD CONTENT WILL BE DESTROYED):
sudo dd if=/dev/zero of=/dev/sda bs=1M status=progress
Then, assuming you want to use the same SD card to store kernel and device tree, we can (optionally) partition it:
./usb_sd_partition.sh
We are ready to write the boot files to some specific sectors of the SD card (MBR and partitions won't be touched):
cd output_smarc-rzg2l/
sudo dd if=bootparams-smarc-rzg2l.bin of=/dev/sda seek=1 count=1
sudo dd if=bl2-smarc-rzg2l.bin of=/dev/sda seek=8
sudo dd if=fip-smarc-rzg2l.bin of=/dev/sda seek=128
sync

(*) Note: the size of the files and SD card reported in this picture are just examples. Actual output files size may be different and there is no limitation on the SD card capacity.
Board Preparation
If you are using the SMARC board you can insert the micro SD card in the SOM module slot:

Change the switches to eSD boot on the carrier board acting on SW11 (SW11-1 ON, SW11-2 ON, SW11-3 OFF, SW11-4 ON):

Change SW1 on the module to select micro sd card slot (SW1-1 ON, SW1-2 ON):

and finally the board is ready to boot from the micro SD card:
NOTICE:  BL2: v2.6(release):7e8696ff4-dirty
NOTICE:  BL2: Built : 12:07:55, Sep  8 2022
NOTICE:  BL2: SD boot from partition 0
NOTICE:  BL2: Load dst=0x1f7c0 src=(p:0)0x10000(128) len=0x10(1)
NOTICE:  BL2: SD boot from partition 0
NOTICE:  BL2: Load dst=0x1f920 src=(p:0)0x10010(128) len=0x28(1)
NOTICE:  BL2: SD boot from partition 0
NOTICE:  BL2: Load dst=0x44000000 src=(p:0)0x10090(128) len=0x6069(49)
NOTICE:  BL2: SD boot from partition 0
NOTICE:  BL2: Load dst=0x1f7c0 src=(p:0)0x10000(128) len=0x10(1)
NOTICE:  BL2: SD boot from partition 0
NOTICE:  BL2: Load dst=0x1f920 src=(p:0)0x10010(128) len=0x28(1)
NOTICE:  BL2: Load dst=0x1f920 src=(p:0)0x10038(128) len=0x28(1)
NOTICE:  BL2: SD boot from partition 0
NOTICE:  BL2: Load dst=0x50000000 src=(p:0)0x16100(176) len=0xa9878(1357)
NOTICE:  BL2: Booting BL31
NOTICE:  BL31: v2.6(release):7e8696ff4-dirty
NOTICE:  BL31: Built : 12:07:55, Sep  8 2022


U-Boot 2021.10-g90edad6e00 (Sep 08 2022 - 11:55:48 +0200)

CPU:   Renesas Electronics K rev 6.15
Model: smarc-rzg2l
DRAM:  1.9 GiB
MMC:   sd@11c00000: 0, sd@11c10000: 1
Loading Environment from MMC... MMC partition switch failed
*** Warning - MMC partition switch failed, using default environment

In:    serial@1004b800
Out:   serial@1004b800
Err:   serial@1004b800
Net:
Error: ethernet@11c20000 address not set.
No ethernet found.
Please note that u-boot by default is configured to store the environment variables on the eMMC boot partition 2. On the Smarc EVKs the SD card slot is shared with eMMC, so environment variables cannot be loaded / saved.
Use SD card for u-boot environment variables
Please note that u-boot by default is configured to store the environment variables on the eMMC boot partition 2. It is possible to configure u-boot to use the SD card also as env variable storage device. We can take advantage of the spare space between the end of FIP and first partition:

To do that it is sufficient to modify the u-boot configuration:
./build.sh u menuconfig
Navigate to "Environment --->" and change:
mmc partition number -> 0: there is only one physical partition on a sd card, so select it.
Environment size -> 0x10000: use 64K space for u-boot environment variables, i.e 128 sectors (512 bytes)
Environment offset -> 0xF0000: this is the offset starting from the base. We want to start from 2048 (first logical partition) - 128 (size) = 1920. 1920 * 512 = 983.040 = 0xF0000

Exit and save.
Change Bus Width
You also need to configure bus width to 4, instead of 8. This can be done by modifying the device tree (arch/arm/dts/smarc-rzg2l.dts):
&sdhi0 {
        /* pinctrl placeholder
         * If this channel is used for interfacing with a SD card, a power enable
         * pin (SD0_PWR_EN) must be defined.
         * The SD0_PWR_EN pin is associated with P4_1.
         * A HIGH signal on SD0_PWR_EN will enable supply voltage for SD card.
        */
        bus-width = <4>;
        status = "okay";
};
Exit and save, then rebuild both u-boot and TF-A and reprogram bl2 and fip binaries as documented in the previous section.
You can also program your own environment variables, creating a binary as described in this section and then program it:
sudo dd if=u-boot-env.bin of=/dev/sda seek=1920
RZG2L Cortex-M33 Multi-OS Package
Instructions for RZV Cortex-M33 Multi-OS Package is located below.
Cortex-M33 Multi-OS Package Support
US108 2D Barcode Scanner Carrier Board
- 2D Barcode Scanner Demo
- Please Click Here...
Importing Orcad design files into Altium
SMARC board schematics and layout are provided in Orcad format only, .dns and .brd respectively. These files can be imported into Altium designer using this guide and/or this guide.
RZ/G2UL Type2 VLP
A RZ/G2UL Type2 EVK is not available for purchase. For evaluation, it's recommended to use the RZ/G2UL Type1 or the RZ/G2LC EVK.
RZ/G2UL VLP releases are prepared for the RZ/G2UL Type1 EVK.
In case the RZ/G2LC EVK is equipped with RZ/G2UL Type2, the following VLP v3.0.1 patch is suitable to build the device tree. File:0001-Added-VLP-v3.0.1-based-RZ-G2UL-Type2-Smarc-board-sup.patch
DirectFB for RZ/G2UL

- Since the RZ/G2UL does not have a GPU, the Weston desktop cannot be used. Instead, graphical applications are required to use the traditional legacy Frame Buffer (/dev/fb0) Linux interface.
- There is an old graphic framework call DirectFB that used to be very popular for the /dev/fb0 interface. You can read it about it here: https://elinux.org/DirectFB
- The project is no longer active, however you can still enable and build the code in Yocto and it is still quite useful for validating LCDs
What is DirectFB2?
- Someone has decided to keep the project going as "DirectFB2" (Article)
- On github, you can find the code (https://github.com/directfb2) and documentations (https://github.com/directfb2/directfb2.github.io)
Instructions for adding the original DirectFB to Yocto:
- DirectFB recipes are included in the standard meta-openembedded layer (meta-openembedded/meta-oe/recipes-graphics/directfb/)
- The source files are downloaded from the Yocto Mirror server since the DirectFB website and repo have been gone for years.
- The Yocto recipes will also apply various patches to fix bugs that were in the final v1.7.7 release of DirectFB.
1. Edit your local.conf file and add these lines:
DISTRO_FEATURES_append = " directfb"
IMAGE_INSTALL_append = " directfb directfb-examples "
2. Build (bitbake) a core-image-minimal or core-image-bsp. Then program your board with that new image.
3. After booting your board, log in as root and create a file /home/root/.directfbrc . Add the below contents to the .directfbrc file. Of course, change the resolution of the mode to match your LCD.
system=fbdev
module-dir=/usr/lib64/directfb-1.7-7/
fbdev=/dev/fb0
mode=1280x720
depth=32
4. Log out, then log back in.
5. Now you can run the directfb examples you build. For example:
$ df_andi
Generally, most of the examples start with "df_" . Here are some that are interesting.
- df_dok
- A benchmark demo that uses all the DirectFB APIs. People used to use this to compare CPU performance.
- df_andi
- Penguin walking demo
- df_knuckles
A 3D skull with rotate light. If you have a mouse, you can rotate the skull.
- df_neo
- Fly icons that change color and size
- df_input
- Used for checking the touchscreen or mouse inputs
- df_windows
- You can move windows around with touch screen or mouse
Enable 2 Ethernet ports on EVK
- There are 2 Ethernet on EVK board. Add-on networking functions may require users to use both ethernet cables. For doing so, please
1. Enable the ETHER0 port in the device tree. For example, enable Eth0 on RZ/Five:
 # <kernel dir>/arch/riscv/boot/dts/renesas/r9a07g043f01-smarc.dts
 10
 11 /*
 12  * DIP-Switch SW1 setting
 13  * 1 : High; 0: Low
 14  * SW1-2 : SW_SD0_DEV_SEL   (1: eMMC; 0: uSD)
 15  * SW1-3 : SW_ET0_EN_N      (0: ETHER0; 1: CAN0,CAN1,SSI1,RSPI1)
 16  * Please change below MACROs corespondingly to SW1 setting
 17  */
 18
 19 #define SW_SW0_DEV_SEL  1
 20 #define SW_ET0_EN_N 0
 21 //#define   SW_ET0_EN_N 1
 22
 23 #include "rzfive-smarc.dtsi"
 24
 25 / {
2. For RZ/Five and RZ/G2UL, please turn switch SW1_3 OFF on the smarc module:

Playing and Recording Audio
- The RZ/G2L SMARC has a WM8978 audio codec. By default, some ASLA settings are not configured so playing and recording is not available.
- For example, if you play audio, you will not hear anything because the volume is set to 0%.
- Before you can play or record audio, please enter the commands below.
$ amixer cset name='Left Input Mixer L2 Switch' on
$ amixer cset name='Right Input Mixer R2 Switch' on
$ amixer cset name='Headphone Playback Volume' 100
$ amixer cset name='PCM Volume' 100%
$ amixer cset name='Input PGA Volume' 25
- Then, you can record audio by using the command below
$ arecord -M -twav -fS16_LE -r8000 /tmp/sample.wav
Note about playing 48KHz and 44.1KHz audio files
The RZ/G2L SMARC EVK is designed to handle both 48KHz and 44.1KHz audio files seamlessly. These two sampling frequencies require 12.288MHz and 11.2896MHz master clock respectively (256x the sample rate). On the SMARC EVK we have a versaclock3 that provides the different clocks. When it comes to audio this is the configuration:
The versaclock3 clock generator generates audio_clk1 (SE1 output), audio_clk2 (Diff2 output), required by the RZ/G2L SSI (I2S peripheral), and audio_mclk (SE2) that is fed into the WM8978 codec as master clock. However the versaclock3 can be reconfigured to switch the audio_mclk dynamically between 11.2896MHz and 12.288MHz. This is done seamlessly because audio_mclk is not a fixed clock, the ALSA framework "sends" the reconfiguration request to both the SSI driver and the versaclock3 driver. The first driver switches reference clock input from audio_clk1 and audio_clk2 and viceversa, the latter driver sets the best clock parent for audio_mclk, that is in fact done by switching from DIV4 to DIV5 via I2C.

This is the screenshot of the versaclock3 Timing Commander utility, that shows the default configuration stored in the OTP.