Cortex-M33 Multi-OS Package Support: Difference between revisions
| Line 121: | Line 121: | ||
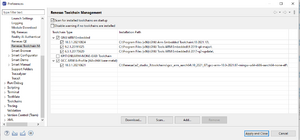
# To check the available compilers on the IDE menu bar select help -> Renesas Toolchain. Check the compiler version matches there version listed on Development Environment section of this page. | # To check the available compilers on the IDE menu bar select help -> Renesas Toolchain. Check the compiler version matches there version listed on Development Environment section of this page. | ||
# If the Compiler is not there but installed Select the Add button an follow the prompts. | # If the Compiler is not there but installed Select the Add button an follow the prompts. | ||
# If the Compiler is not installed down load the compiler using the links shown in Development Environment section of this page. Download and install the compiler. Then follow step 2. | # If the Compiler is not installed down load the compiler using the links shown in [[Cortex-M33_Multi-OS_Package_Support:Development Environment|Development Environment]] section of this page. Download and install the compiler. Then follow step 2. | ||
[[File:image 2023-03-07 180341219.png|thumb|150x150px]] | [[File:image 2023-03-07 180341219.png|thumb|150x150px]] | ||
| Line 133: | Line 133: | ||
== OpenAMP Demo == | == OpenAMP Demo == | ||
This demo is included in the Multi-OS Package Yocto Package. This demo requires that the Multi-OS Package was included in the Yocto BSP Build. See | |||
Revision as of 02:34, 8 March 2023
General Information
Official RZV2L Cortex-M33 Multi-OS Package
Official RZG2L/UL Cortex-M33 Multi-OS Package
Development Environment
The firmware that runs on the CM33 requires the following tools for development. These tools can be hosted on a PC running Windows or Linux.
Renesas e2studio IDE supports application development and debugging for the Cortex-CM33
Please review the RZG2L Getting Started Guide. This document includes information about setting up the IDE for RZG2L/CM33 Development, loading, and running Cortex-CM33 Applications.
NOTE: For Windows user the compiler and Segger J-Link are installed as part of the installation. See Getting Started with Flexible Software Package Document.
NOTE: For Linux users the compiler and J-Link need to be installed separately as directed in the Getting Started with Flexible Software Package Document.
Getting Started with Flexible Software Package
The Cortex-M33 supports the the Reness FSP ( Flexible Software Package ).The documents and FSP package can be found here. For Linux Users, follow the instruction in section 2.2 in the Getting Started with Flexible Software Package Document to install the FSP on the IDE.
RZV2L
- Official RZV2L Cortex-M33 FSP Getting Started Document
- Windows RZV2L FSP Package (executable)
- This is located on the Official Renesas Cortez-M33 Multi-OS Page ( RZV_FSP_Packs )
- Linux RZV2L FSP Package (archive)
RZG2L/UL
- Windows RZG2L/UL FSP Package (executable)
- This is located on the Official Renesas Cortez-M33 Multi-OS Page ( RZG_FSP_Packs )
- Linux RZG2L/UL FSP Package (archive)
CM33 e2studio GDB Debug
- Build the BSP and downloaded the latest ARM Trust Zone Loader and Uboot. This is very important because the loaders setup the board and processor hardware ( CM33, DRP, ... ). The preinstalled loaders on the board do not properly setup the processor and board.
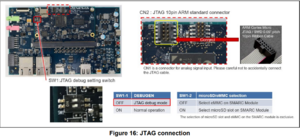
- Set the SW1 switch to enable the JTAG and SW11 to QSPI Flash or Serial Interface. ( See figure JTAG Connection and SW11 Settings ).
- Press the power button on the board. You should see three LEDS. If the USB wire is connected to the Serial Interface you should see the uboot start up.
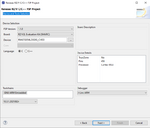
- Create a RZV2L Project.
- Set the Board to RZV2L Evaluation Kit (SMARC). This will set the project GPIO pins correctly
- Device settings: R9A07G054L23GBG
- Debugger: J-Link ARM
- Choose either Mare Metal - Blinky or FreeRTOS - Blinky. Theses projects will generate the GPIO code for the LED.
- Compile Project
- If there are error check the correct compiler is selected or open the FSP perspective and click generate code.
- Open the Project Debug Configuration ( Run -> Debug Configuration ). Under Renesas GDB Hardware Debugging, select the configuration with the same name as your project name.
- In the Debug Configuration -> Debugger Check the following settings.
- Target Device is R9A07G054L_M33
- Connection Settings -> Rest on connection is set to No
- In the Debug Configuration -> Startup
- Reset and Delay is unchecked
- Run Commands:
set {int} 0x4102080C=0x1001FF80
set {int} 0x41020810=0x00010000
- Press Apply then debug.
Yocto Build
This section describes how to add the Cortex-M33 Multi-OS Package to the yocto build. This package will add a command to uboot to start the CM33 processor and add the OpenAMP Multi Processor Communication Software to the Linux BSP.
OpenAMP
The Open Asymmetric Multi-Processing (OpenAMP) is a framework providing the software components needed to enable the development of software applications for Asymmetric Multiprocessing (AMP) systems. This allows communications between Cortex M33 and Cortex-A cores.
Getting Started
The Multi-OS Package assume that only the BSP, Video Codec, and GPU are installed. By adding the Multi-OS package, it will overwrite the RZV2L BSP meta-rz_features layer.conf file. This will remove the DRP and/or ISP package configuration. Follow the steps below to add the MultiOS without removing the DRP and/or ISP packages
| Multi-OS Package v1.10 Build steps |
### Extract the BSP Linux package
..
### Copy/Move the 'RZV2L Codec Library v1.0.1' Zip file (RTK0EF0045Z15001ZJ-v1.0.1_EN.zip) under the BSP directory.
..
### Copy/Move the 'RZV2L ARM Mali-GPU Library v1.4' Zip file (RTK0EF0045Z13001ZJ-v1.4_EN.zip) under the BSP directory.
..
### Setup the RZV2L MultiOS CM33 under the BSP, Codex and GPU directory.
### Install the and boot commands OpenAMP library
unzip $SRC_DIR/r01an6238ej0110-rzv2l-cm33-multi-os-pkg.zip
tar -zxvf r01an6238ej0110-rzv2l-cm33-multi-os-pkg/meta-rz-features.tar.gz
### Extract the 'DRP-AI Driver Support' package file (meta-rz-features.tar.gz) under the rzv2l_drpai-driver directory. .. ### Copy/Move the ISP Support archive file ( r11an0561ej<version>-rzv2l-isp-sp.zip ) ..
### Reinsert the MultiOS recipe into the meta-rz-features/conf/layers.conf
cd $WORK_DIR
sed -i '/demos.inc/a include ${LAYERDIR}/include/openamp/openamp.inc' ./meta-rz-features/conf/layer.conf
cd $WORK_DIR source poky/oe-init-build-env cp ../meta-renesas/docs/template/conf/smarc-rzv2l/*.conf ./conf/ ### Build bitbake core-image-weston |
Cortex-M33 Multi-OS Demos
Blinky and Minimal
These demos are created when a new eclipse project is created. The procedure to create the demos is well documented in the Getting Started with Flexible Software Package. The main difference between these two projects is the Minimal Project includes the minimal FSP Driver components to run the OS or Baremetal project. The Blinky adds GPIO and tImer components to blink the leds.
FAQ
Compiler errors:
Make sure that you are using the correct GNU GCC Compiler version. The compiler used for the RZ is not the same as the RA. Refer to Development Environment section of this page to make sure the correct compiler is installed.
- To check the available compilers on the IDE menu bar select help -> Renesas Toolchain. Check the compiler version matches there version listed on Development Environment section of this page.
- If the Compiler is not there but installed Select the Add button an follow the prompts.
- If the Compiler is not installed down load the compiler using the links shown in Development Environment section of this page. Download and install the compiler. Then follow step 2.
Check the correct Board:
When creating a project be sure to select the EVK board in the Device and Tools Selection Dialog. The Device will automatically be selected. This is important of the Blink Demo.
OpenAMP Demo
This demo is included in the Multi-OS Package Yocto Package. This demo requires that the Multi-OS Package was included in the Yocto BSP Build. See


